Many great exercises are considered standards for targeting your lower-body muscles, including squats, deadlift variations, leg curls, and leg presses. However, as a certified personal trainer (CPT), I have two issues with the exercises I just name-dropped. First, they require equipment, and second, they may cause pain or discomfort in the knees or lower-back muscles (especially if done without proper form). The solution? Lower-impact, bodyweight exercises such as wall squats.
RELATED: Bodyweight Workouts
I’ll begin this guide by explaining how to do wall squats with the correct form and then give modifications, variations, and alternative exercises to try. Next, you’ll learn the benefits of wall squats and common mistakes to avoid. To finish, I’ll share the main muscle groups worked by wall squats and their functions.
Let’s get started on building your leg muscles!
How To Do Wall Squats
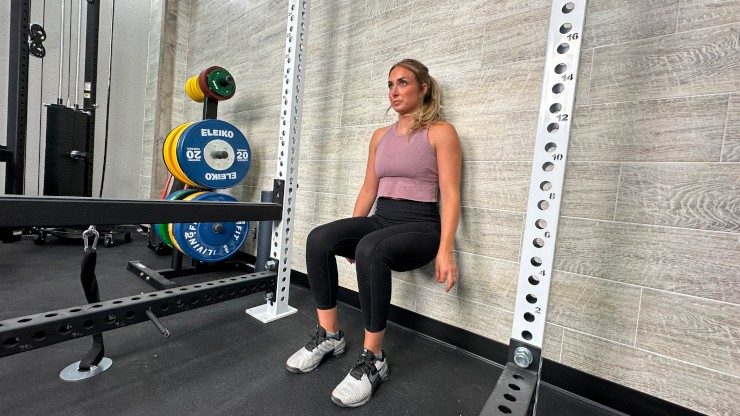
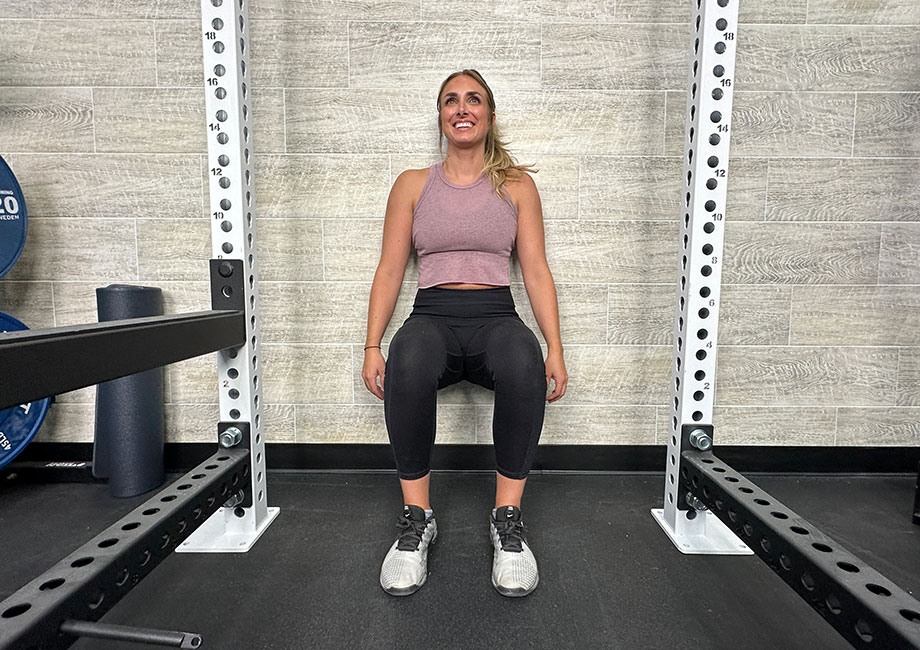
The wall squat exercise is a bodyweight exercise, so other than a wall, it doesn’t require equipment. This makes it a fantastic exercise for beginners who want to build strength in their lower body but don’t have regular access to a gym or equipment such as dumbbells or barbells. It’s also a great hotel room exercise when traveling. Just remember to keep your glutes and upper back in contact with the wall at all times.
How to do it:
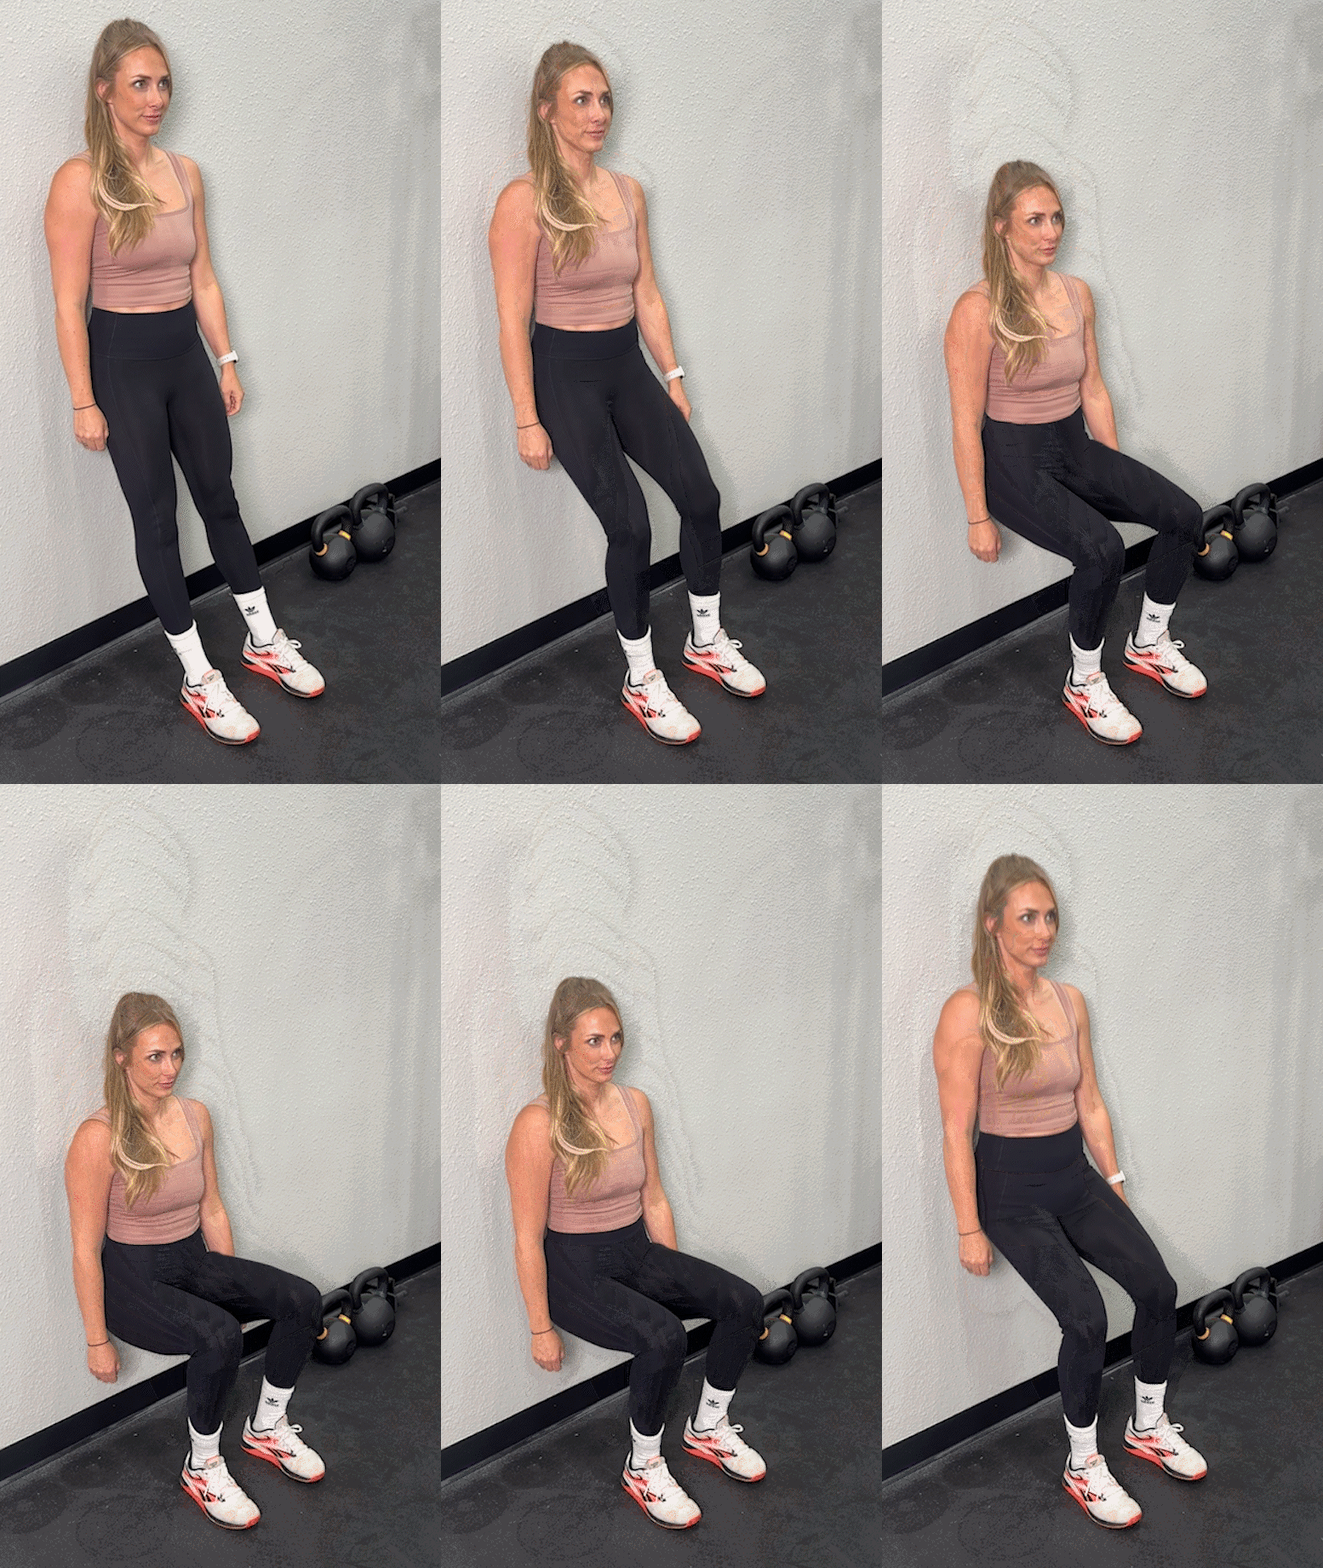
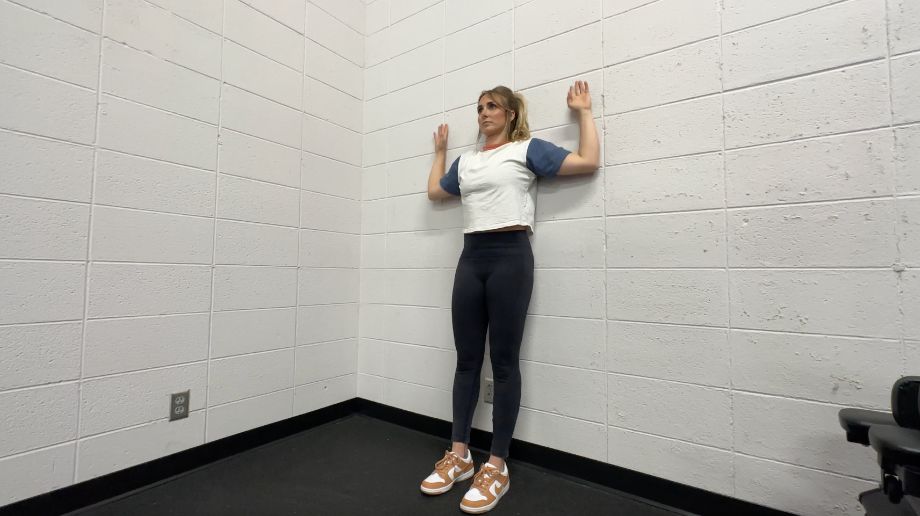
- Stand upright against a wall or flat surface with your arms resting by your sides. You’ll want the back of your head, the back of your shoulders, and your glutes flush against the wall.
- Take a couple of steps forward.
- Brace your core and lift your chest. Then, slide down the wall, ensuring that your glutes and upper back stay in contact with it.
- Keep lowering your upper body until your quads are parallel to the floor.
- Hold this squat position for the desired length of time.
- When finished, slide back up the wall to return to the starting position.
- Repeat for reps.
Modifications
- Dial it back: If you’re finding wall squats difficult, reduce the length of time that you hold the squat position. Alternatively, instead of forming 90-degree angles with your legs—quadriceps parallel to the floor—stand in a slightly higher position.
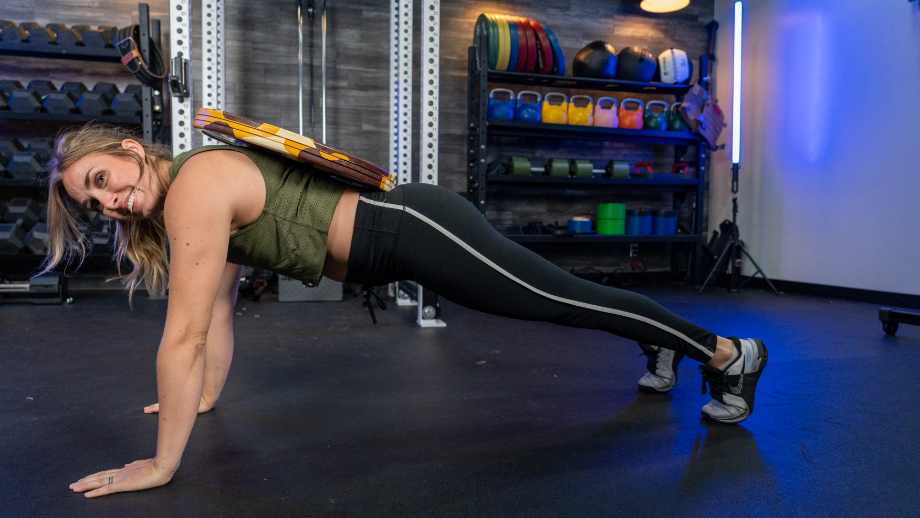
- Make it harder: To make wall squats harder, increase your duration. You can also hold a pair of dumbbells by your sides, or place a weight plate on your lap. I’ve also included three wall squat variations below for those who want an extra challenge.
How To Do Wall Squats At Home
Wall squats are a simple exercise that requires no equipment. To do them at home, all you need is a wall. If you find wall squats too easy and want to add extra resistance, find a heavy household object (for example, laundry detergent) and place it on your lap.
Wall Squat Variations
Single-Leg Wall Squat
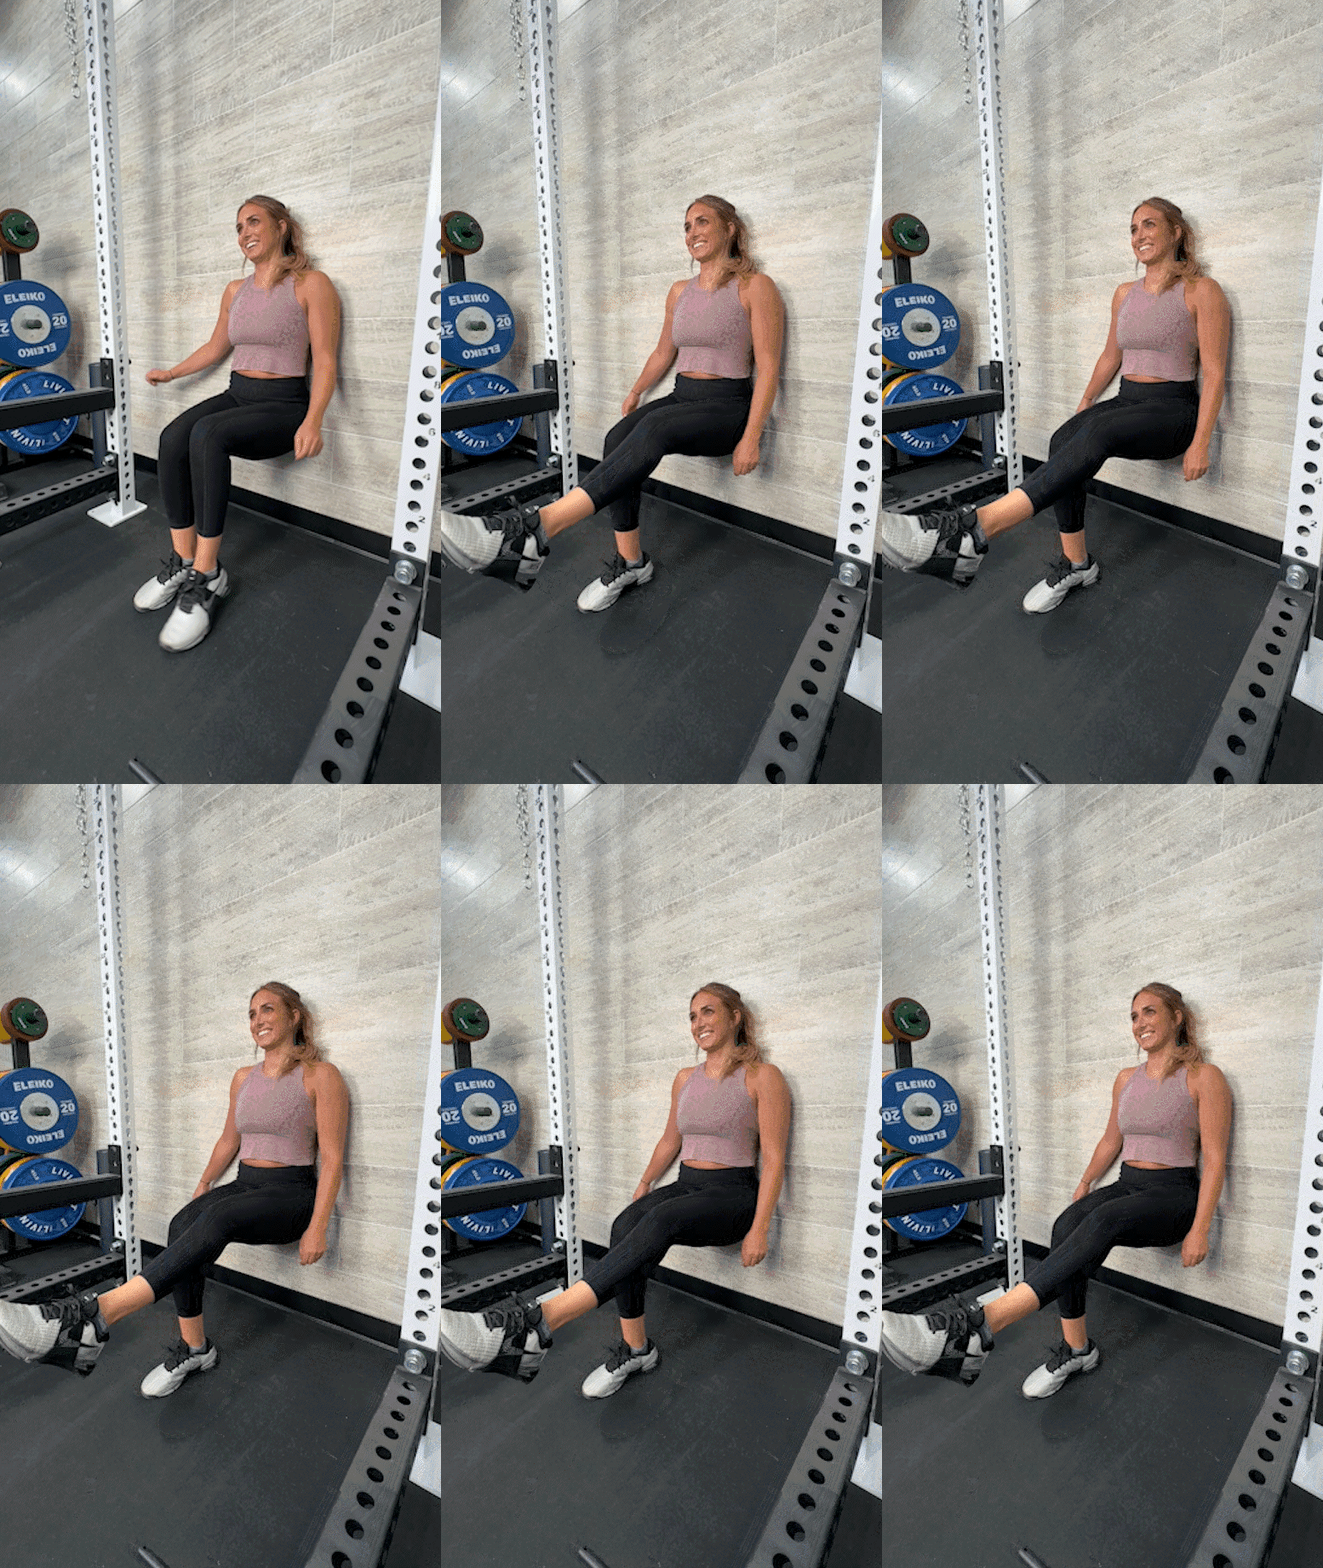
If you want to fix muscular imbalances and address bilateral deficits1, work each side of your body separately. Before squatting, lift one foot off the ground and keep the other fixed. Perform the wall squat exercise as above, and then switch to the other side.
Stability Ball Wall Squat
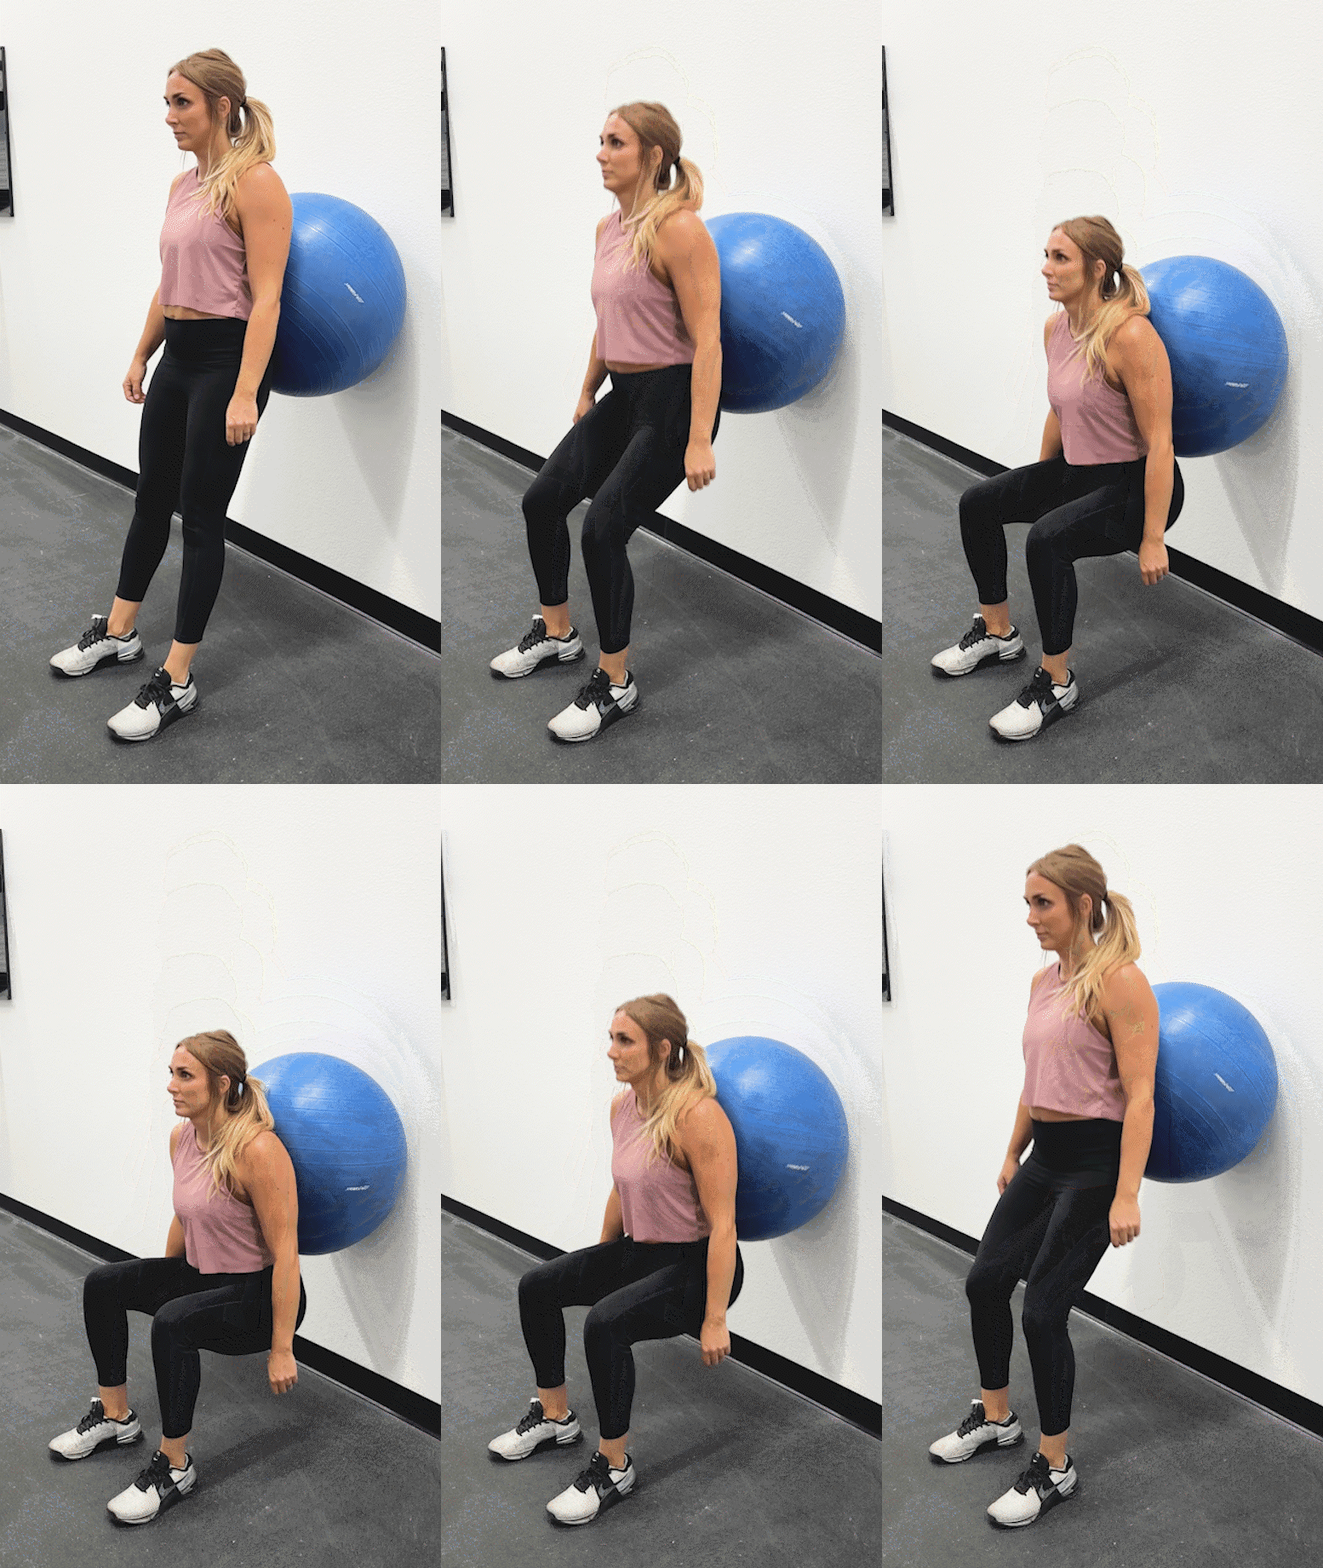
Placing a stability ball between your back and the wall makes wall squats easier because the ball provides additional support. If you’re new to strength training—or suffer from knee or back pain—this is a great exercise to add to your training repertoire.
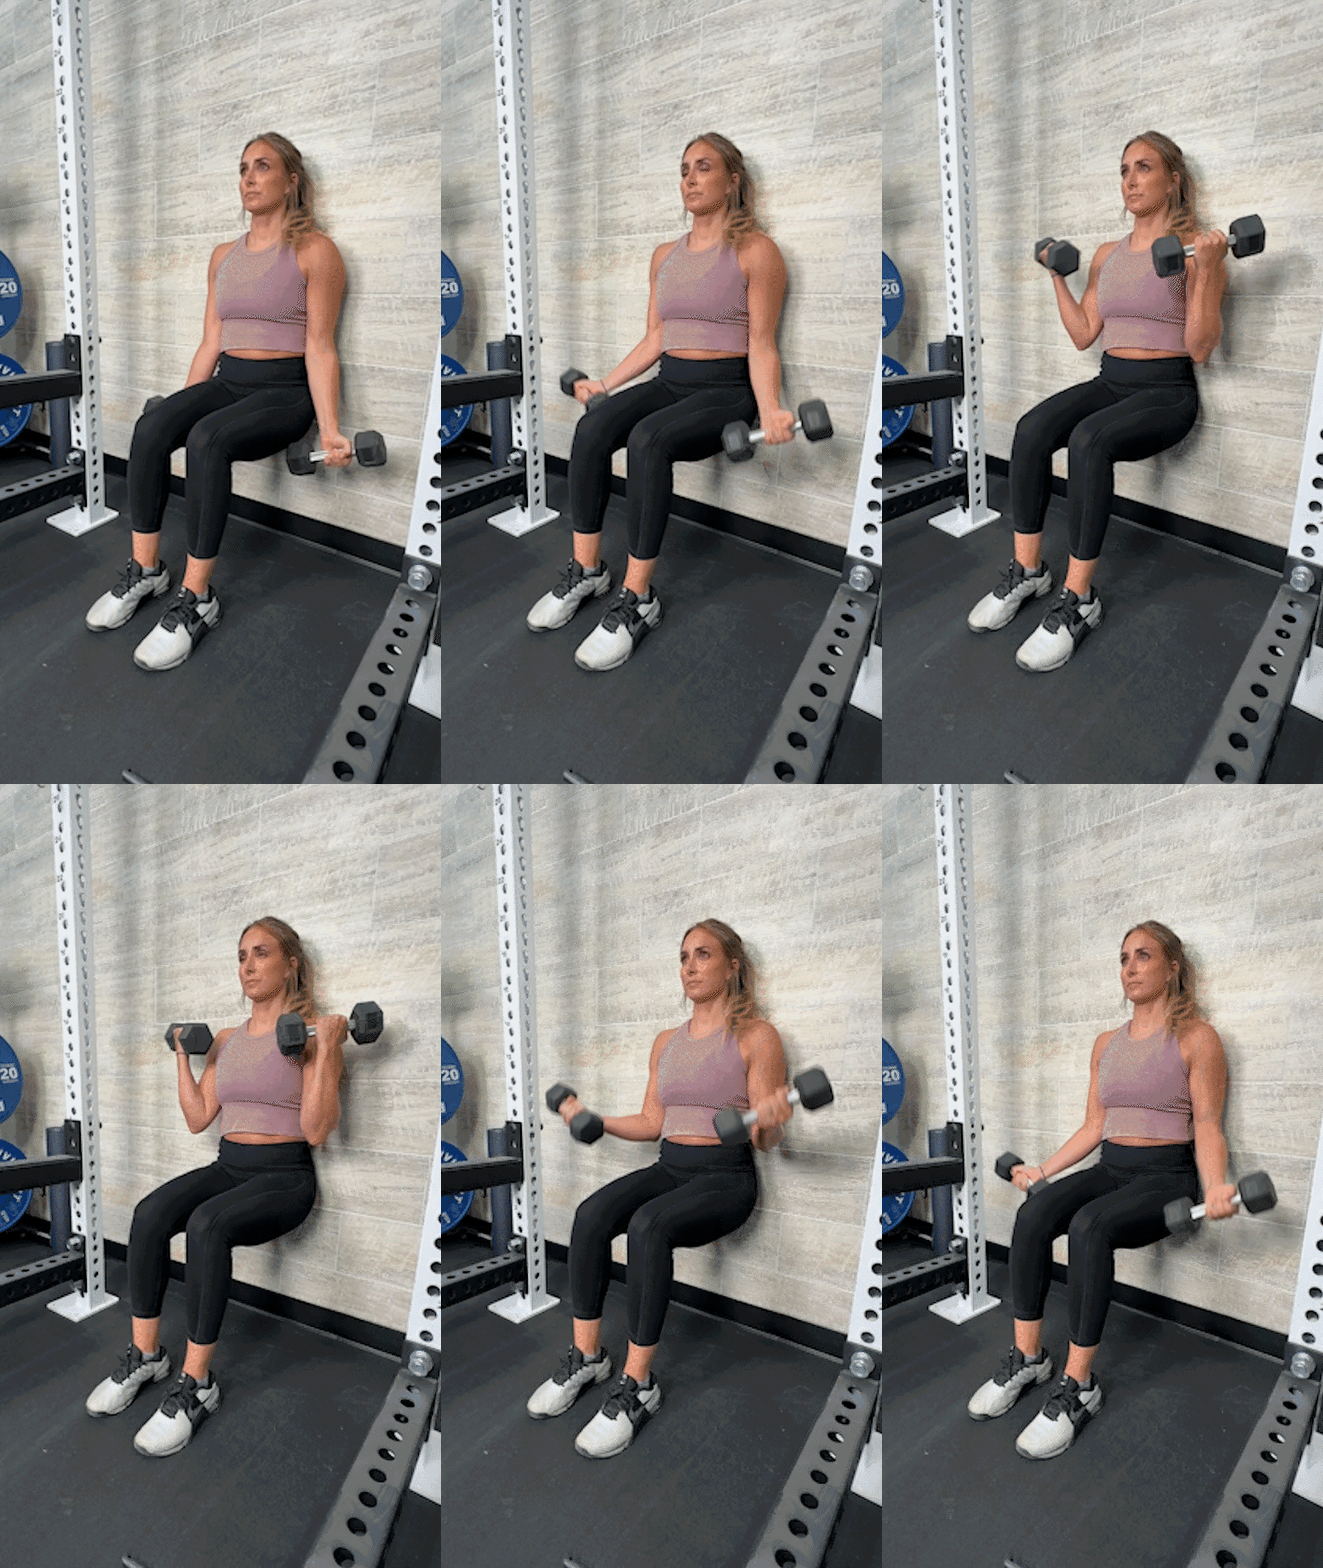
Wall Sit with Biceps Curl
The wall sit exercise works every muscle group in your lower body, but why stop there? With this exercise, you activate your biceps, too. Hold a pair of the best dumbbells, squat down, and then do biceps curls until you can no longer hold the squat position.
Wall Squat Alternatives
Wall squats can be a great addition to leg day to help build lower-body strength. However, they’re not the only way to achieve this goal. Below are five wall squat alternatives I recommend to clients:
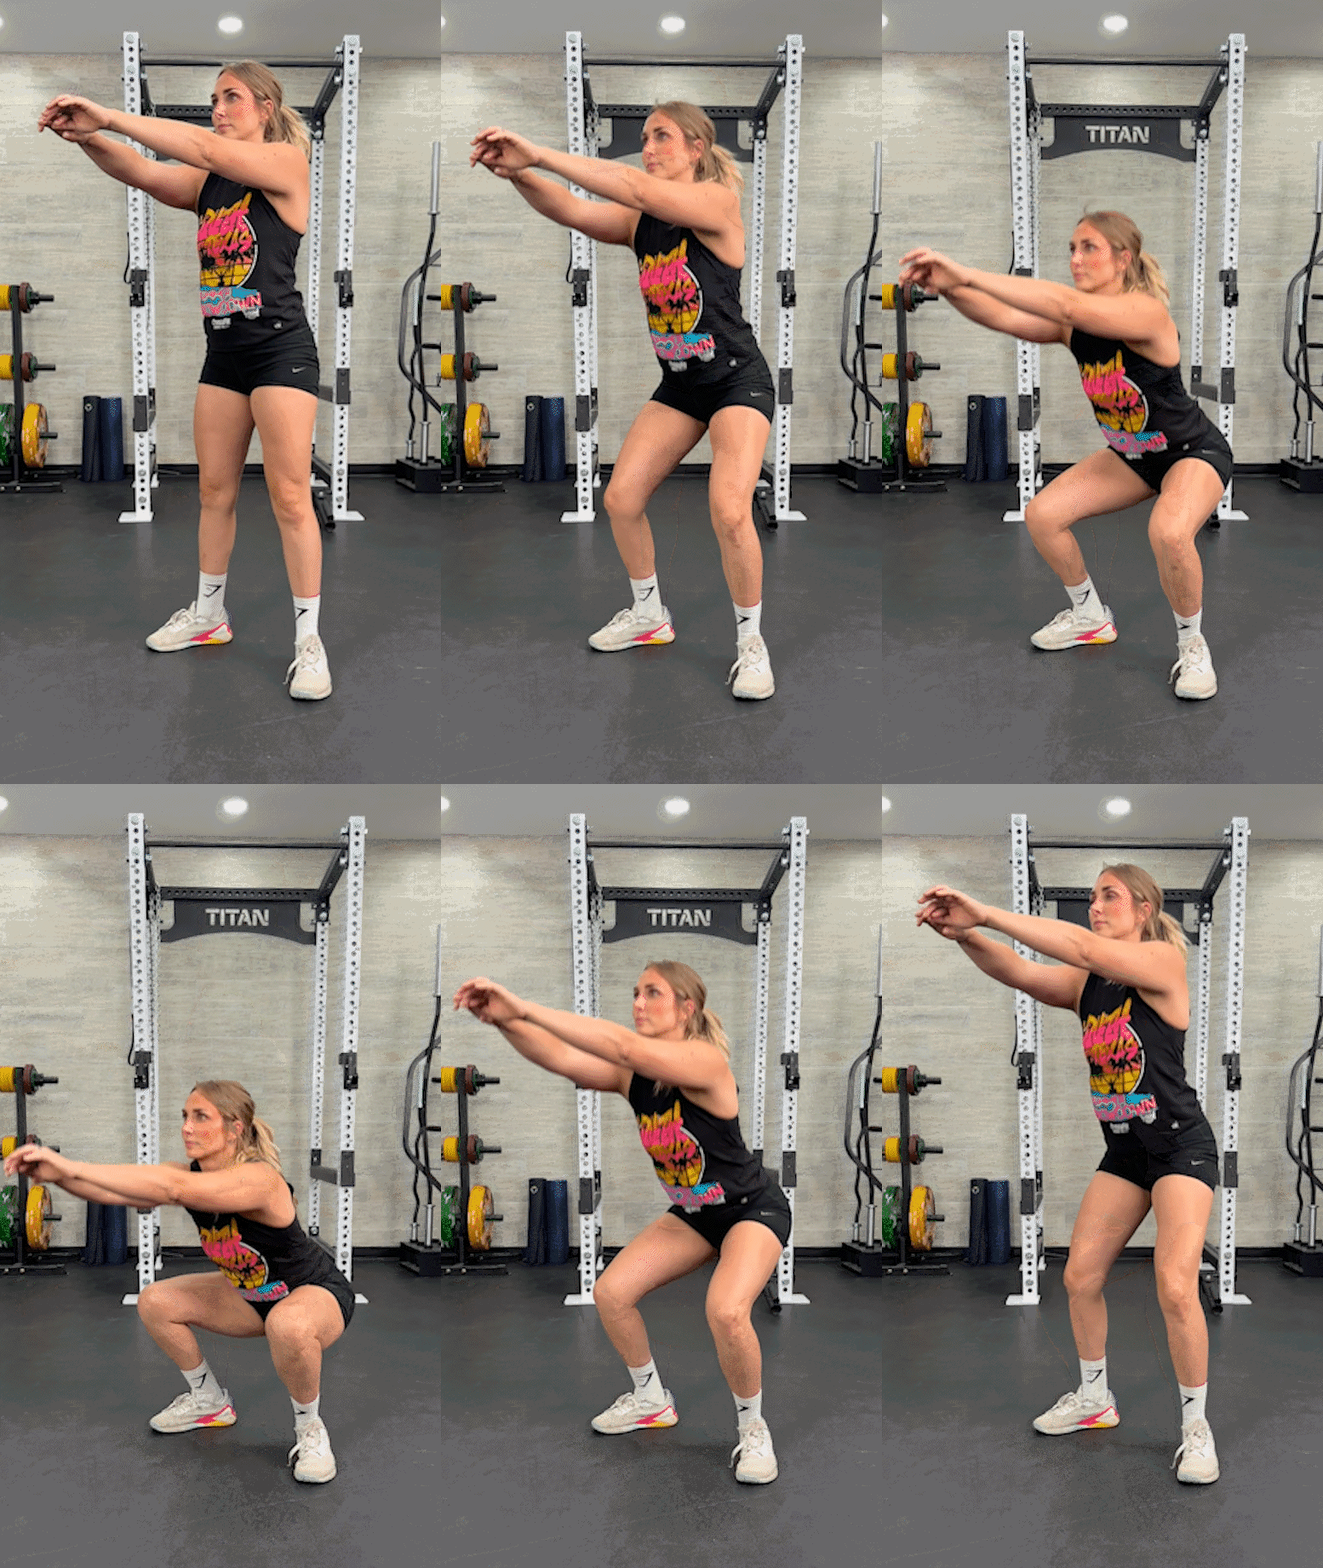
Air Squat
Why do it: Air squats—aka bodyweight squats—require no equipment, similar to wall squats, and you can perform them nearly anywhere. The main benefit of air squats over wall squats is that the former is more functional because you’re completing a dynamic movement for reps rather than holding a static position.
How to do it:
- Stand tall with your feet hip-width apart.
- Position your arms either down by your sides, extended in front of your body, or across your chest. Squeeze your glutes, engage your core, and keep your head neutral.
- Squat toward the floor by bending your knees, ensuring that your knees align with your toes. Then pause momentarily when your quadriceps are at least parallel to the ground.
- Drive your heels into the floor to slowly return to the standing position.
- Continue for the desired number of reps.
RELATED: Proper Squat Form
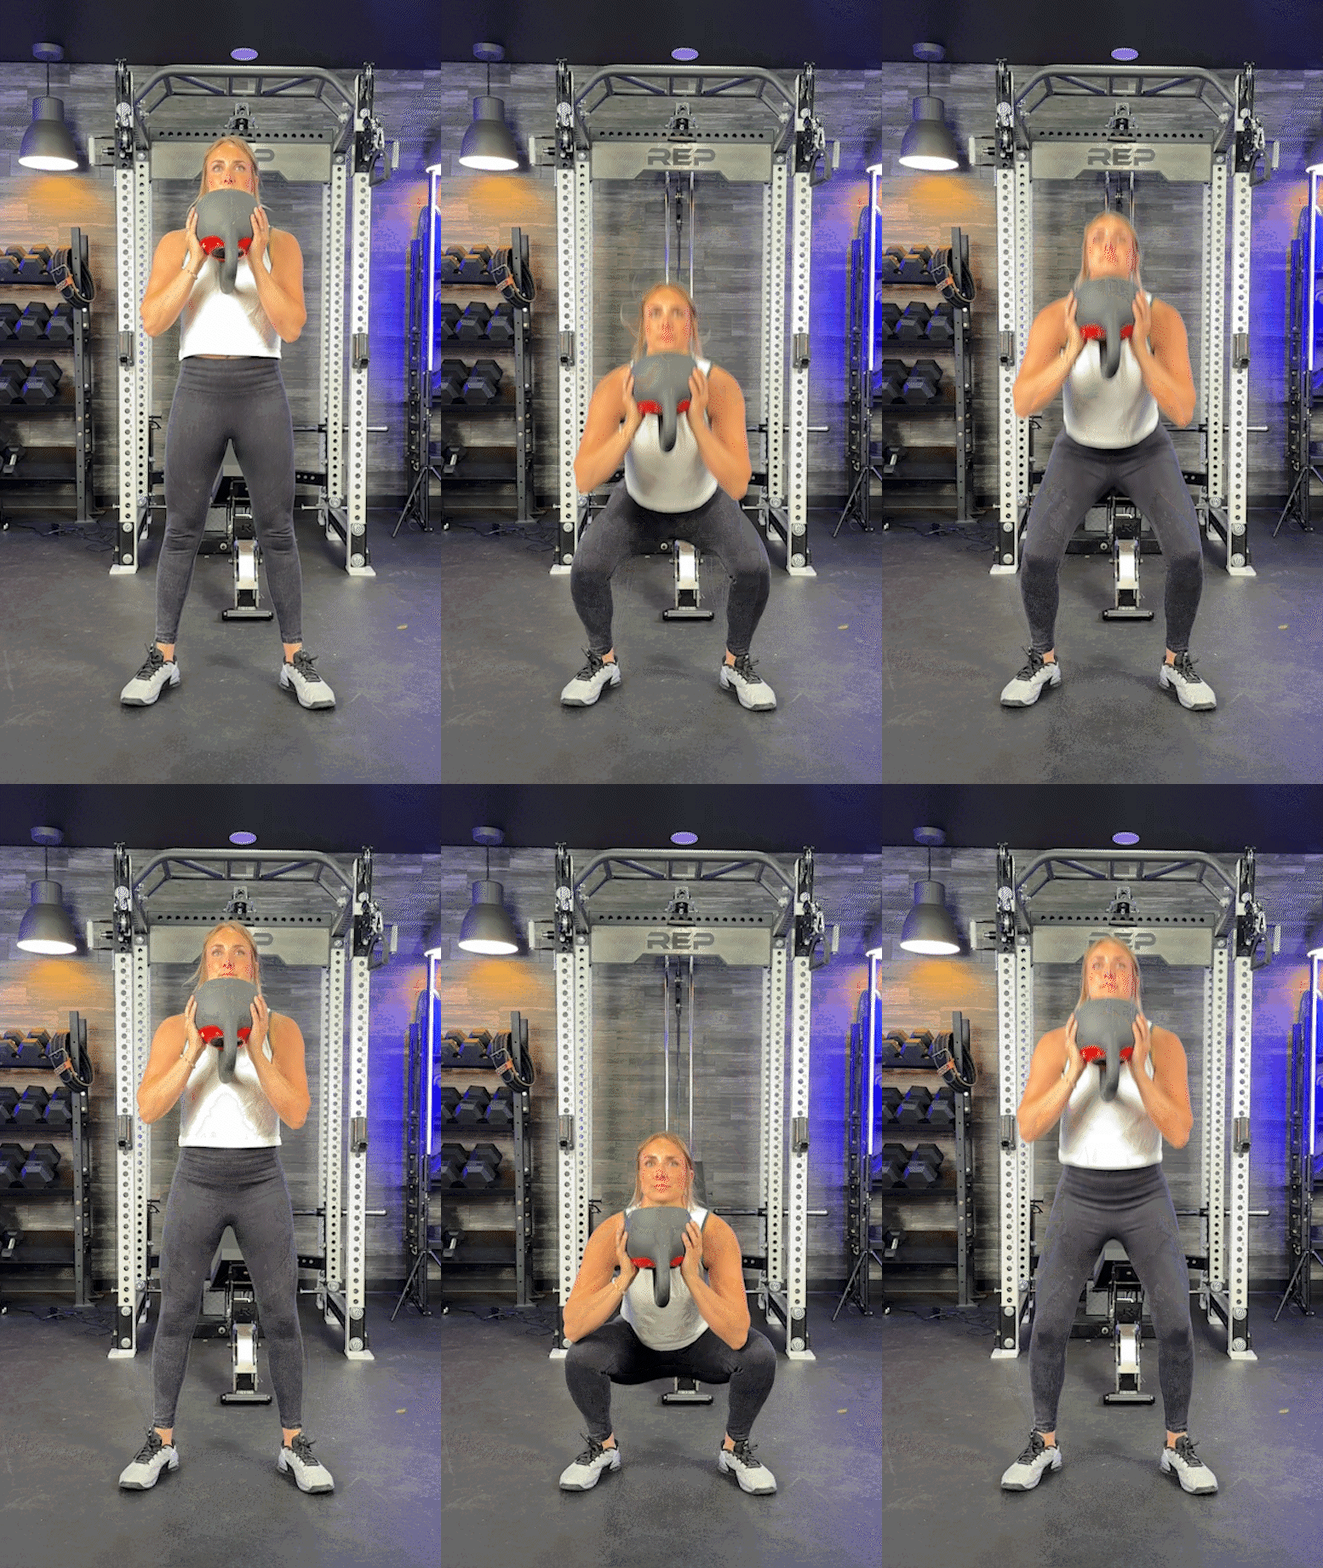
Kettlebell Goblet Squat
Why do it: Kettlebell squats will work your full body, so some gym-goers prefer them to wall squats. You’ll achieve lower-body burn and activate your upper back, shoulders, and arms as you hold the kettlebell in both hands. Kettlebell goblet squats are also more functional than wall squats.
How to do it:
- Choose your desired kettlebell.
- Stand upright with your feet shoulder-width apart. The kettlebell should be positioned in front of your chest, and you should be holding it with both hands.
- Keep your head neutral, brace your core, and squeeze your glutes.
- Squat down, similar to sitting down in a chair.
- Continue until the front of your thighs are at least parallel to the floor, if not deeper. Hold.
- Reverse the motion by pushing back up through both feet.
- Repeat for reps.
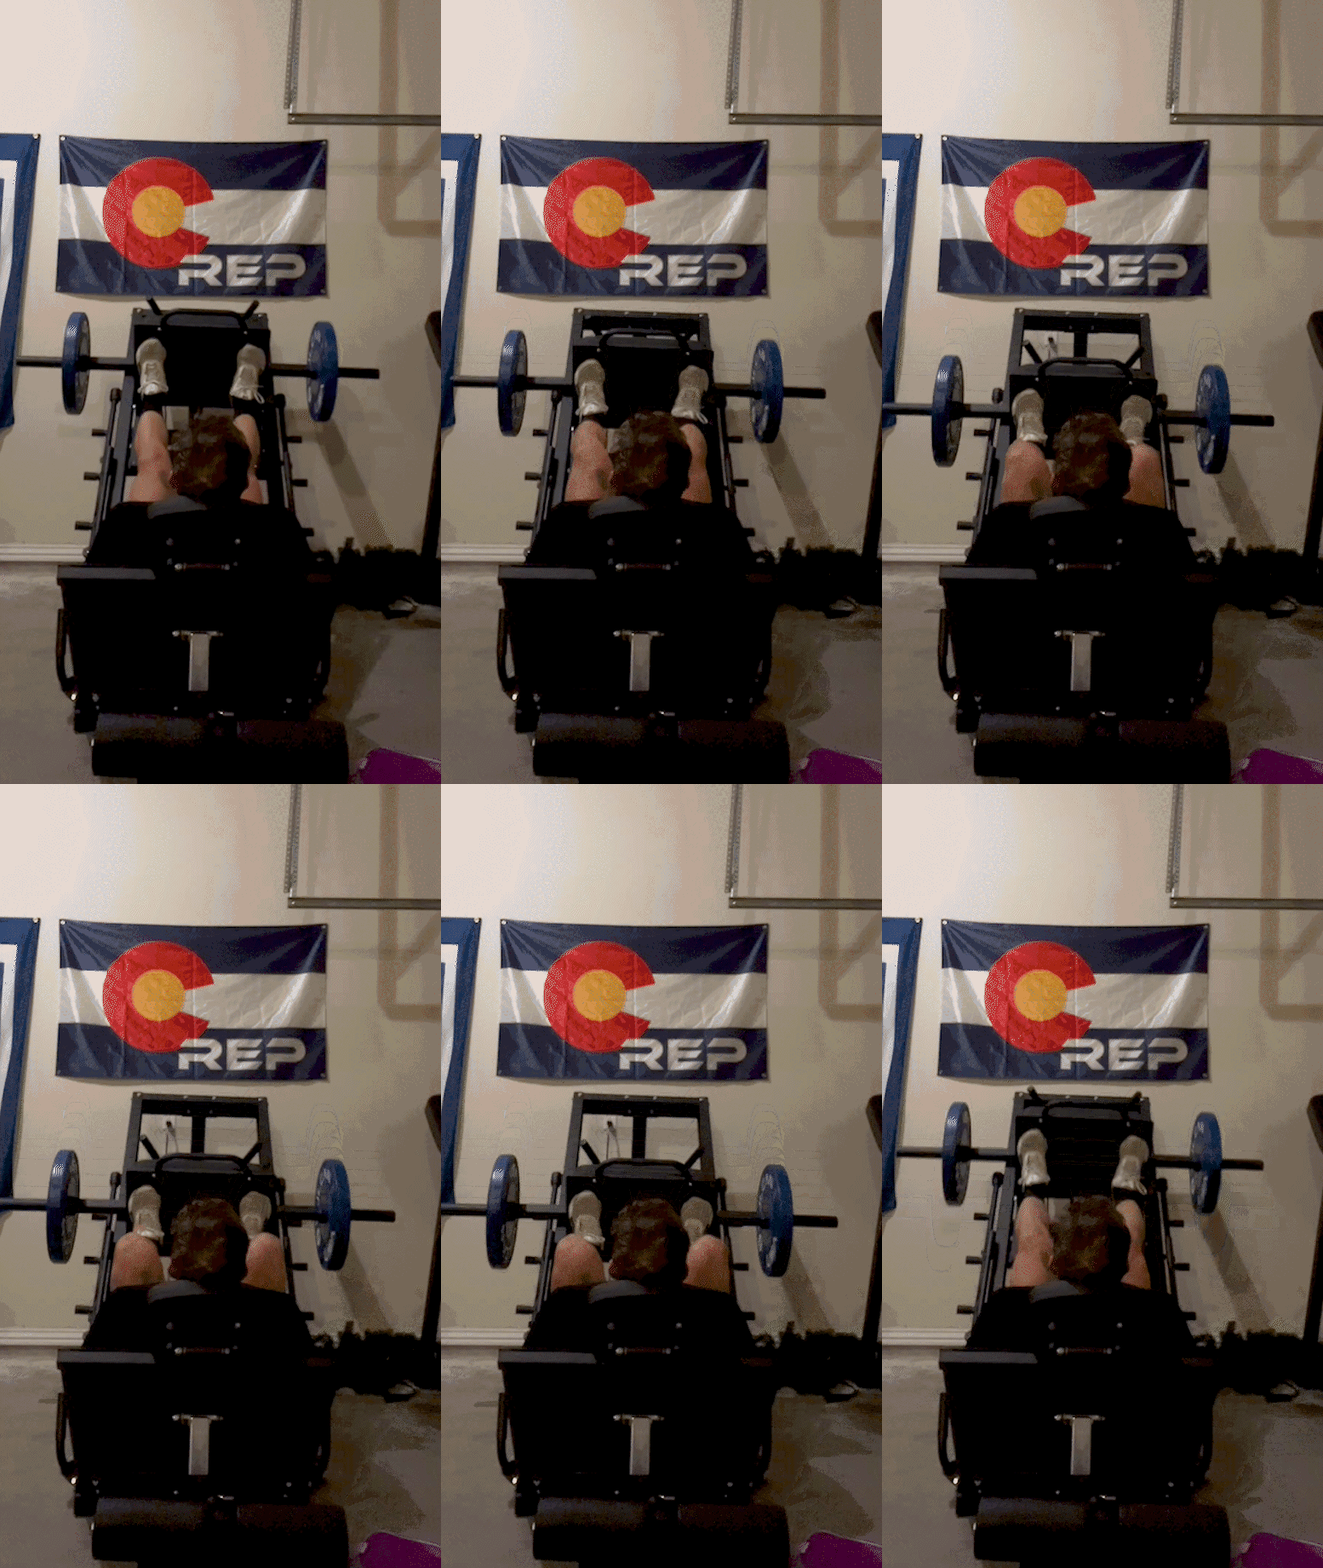
Leg Press
Why do it: A 2020 International Journal of Environmental Research and Public Health2 study found that during the leg press, “the quadriceps muscles elicited the greatest muscle activation, principally the vastus medialis and vastus lateralis, followed closely by the rectus femoris.” If strengthening your quads is your primary goal, leg presses may be better than wall squats.
For those who don’t have a gym membership or access to a leg press machine, don’t stress the press—we have a detailed guide on how to do a leg press at home.
How to do it:
- Load both sides of a leg press machine with the required weight plates.
- Sit down, ensuring that your head and back are resting against the padded supports.
- Place both feet flat against the platform. You’ll want your feet to be roughly hip-width apart.
- Activate your core and grip the handles for additional support.
- Lower the platform toward you, making sure that your knees are aligned with your toes.
- Pause momentarily when you can’t lower any further, and then push through your heels to return to the original position.
- Repeat for reps.
Expert tip: When you push through your heels with the leg press, don’t lock out your knees at the top of the movement. This is especially important when you load the machine with heavy weights because it can help to avoid knee strains and injuries. You may also consider using knee sleeves for additional support and protection.
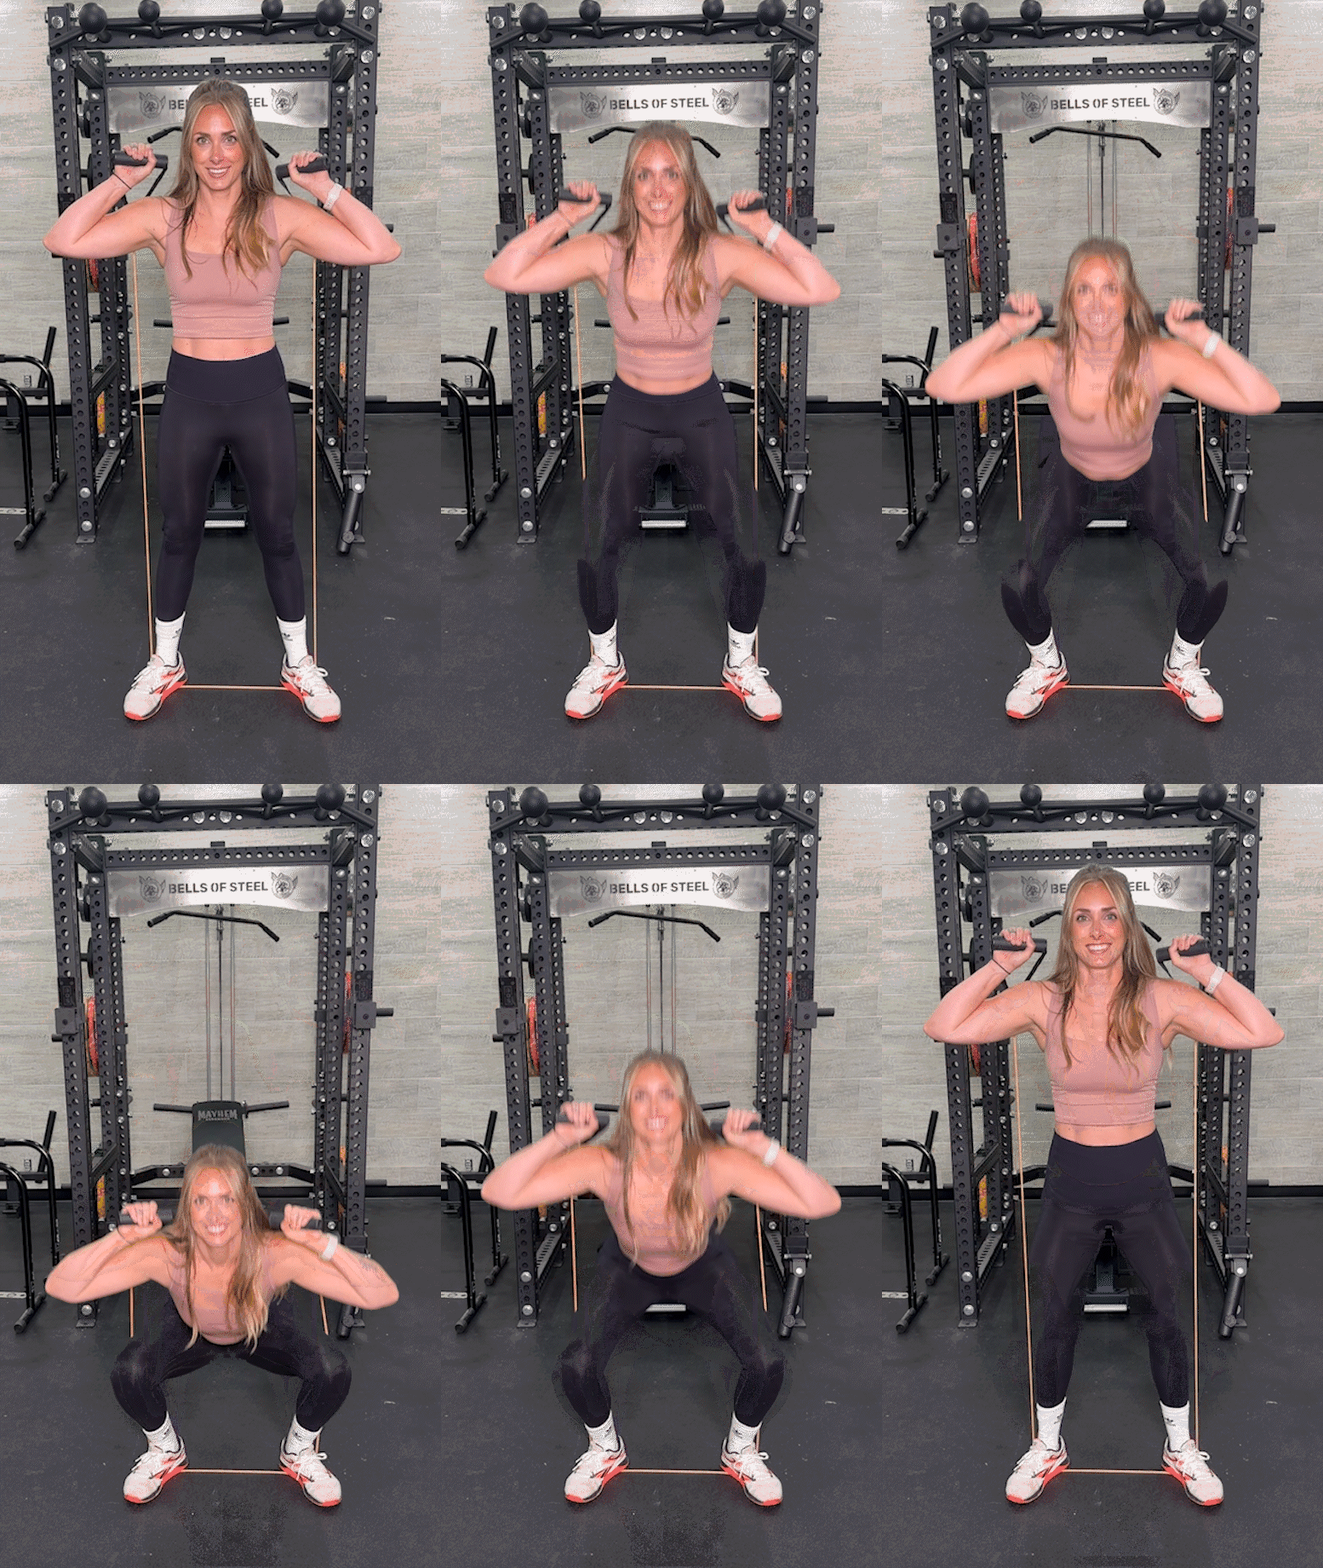
Banded Squat
Why do it: Performing squats with resistance bands has two main advantages over wall squats. First, similar to the air squats and kettlebell goblet squats above, banded squats are a more functional movement than wall squats. Banded squats also engage additional muscle groups not targeted during wall squats—your hip flexors, for example.
How to do it:
- Stand tall with your feet hip-width apart.
- Step onto one end of a best resistance band with both feet.
- Place the other end of the resistance band at the back of your neck, ensuring that you’re holding it with both hands.
- Activate your core, squeeze your glutes, and keep your head neutral.
- Squat towards the floor by bending your knees and hips.
- When your quads are at least parallel to the ground (if not deeper), hold.
- Stand up by pushing against the resistance of the band.
- Continue for repetitions.
RELATED: Hip Flexor Exercises
TRX Squat
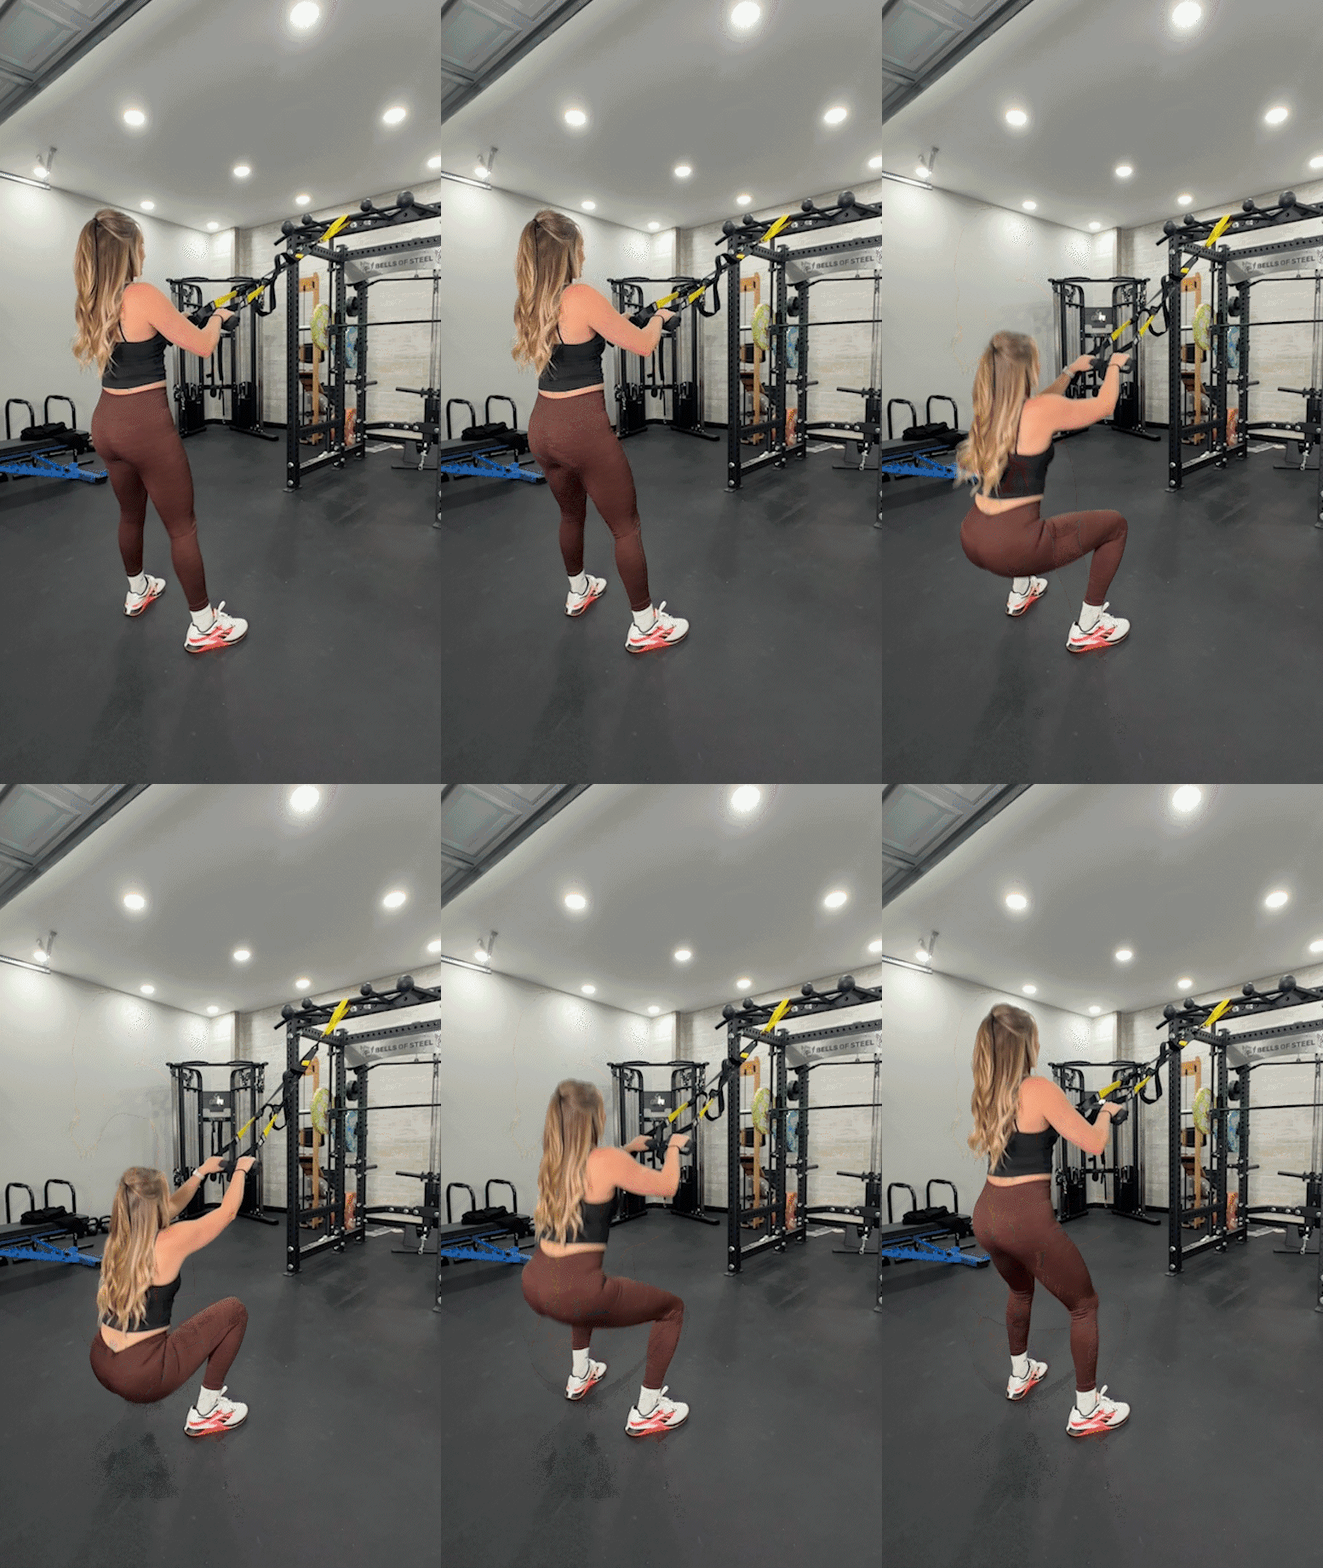
Why do it: Because you’re using a TRX suspension system, you may be able to squat deeper with TRX squats than you can with wall squats. This can help with the hypertrophy of your lower-body muscles.
How to do it:
- Adjust a TRX suspension system so the handles are at roughly knee height.
- Grasp the handles while standing. You’ll want to be facing the anchor point.
- Step backward until you’re comfortable and the TRX suspension system is taut.
- Position your feet shoulder-width apart, brace your core, and keep your head neutral. You’ll want your elbows to be tucked into your sides.
- Squat down, similar to if you were sitting on a chair. Pause momentarily when your legs form 90-degree angles (if not deeper).
- Drive through both feet to return to the standing position.
- Repeat for the desired number of reps.
Expert tip: For those who find TRX squats easy, you can progress to alternate TRX exercises like TRX jump squats or TRX single-leg squats for an added challenge.
Benefits of Wall Squats
Why should you include wall squats in your lower-body or high-intensity interval training (HIIT) workouts? They can help build muscle in the lower body, have a lower impact compared to other leg exercises, and may help reduce blood pressure levels.
Boost Hypertrophy of the Lower-Body Muscles
I’ll explain the various muscles worked by wall squats and their functions below, but for now, it’s helpful to know that wall squats can activate every muscle group in your lower body. They’re a bodyweight exercise that you can perform nearly anywhere to build strength in your legs and core by doing a couple of sets in the morning before work or during your lunch break.
They’re a Low-Impact Exercise
As a certified personal trainer (CPT), I’ve found that some clients experience difficulty with exercises like back squats because they may cause low back or knee pain. I get it—I feel it, too, as I’ve gotten older. Wall squats are a lower impact exercise than many other leg exercises. So, if you’re a beginner to strength training—or recovering from an injury—you may want to add wall squats to your training arsenal.
May Help Lower Blood Pressure
A 2014 Journal of Sports Sciences3 clinical trial found that “the wall squat may have a useful role to play in isometric training aimed at reducing resting blood pressure.” Although a healthcare professional is a better resource for advice on lowering your blood pressure, it’s great to know that exercises such as wall squats may help make a difference.
RELATED: Isometric Exercises
Common Wall Squat Mistakes
You’ve learned the benefits of wall squats, and now you want to start squatting straight away. Not so fast! Here are three common wall squat mistakes to avoid:
Your Feet Are Too Close or Too Far From the Wall
As I mentioned in the form directions above, you should take one or two steps forward with your feet before squatting down. This enables you to squat deeper. If your feet are too close to the wall, you won’t be able to reach your full range of motion, limiting your gains. On the other hand, if your feet are too far from the wall, you’ll place unnecessary stress on your ankles, knees, or lower back. Spend some time working out the best foot position for your needs.
Your Back Isn’t Fixed to the Wall
During wall squats, ensure that your back is flat against the wall at all times. When the exercise gets challenging, some people lift their upper back off the wall, thus rounding their lower back, which may lead to injury. If this happens to you, stop the exercise, rest for a minute or two, and then start again with the proper form.
Your Weight Distribution Isn’t Equal
Some people shift more of their body weight onto their dominant side during wall squats. I can understand why—it feels more comfortable than placing weight on your weaker side. However, this isn’t correct, and your weight distribution should be equal. If you’re finding this balance difficult, consider doing single-leg wall squats instead (see above), because this works each side of your body separately.
Muscles Worked By Wall Squats
Wall squats predominantly target the muscles in your lower body. Below is a breakdown of each muscle group and its primary function:
- Quadriceps: The quadriceps muscle4 controls knee extension, hip flexion, posture, step/gait, and patellar (knee) stability.
- Hamstrings: The hamstring muscles5 contribute to hip extension (the posterior movement of the femur) and knee flexion (the posterior movement of the tibia and fibula).
- Gluteus maximus: The principal function of the gluteus maximus6 is as the chief antigravity muscle during sitting by counteracting and controlling hip flexion. It also extends and externally rotates the thigh muscles.
- Calves: The calf muscles7 are responsible for plantarflexion of the foot and ankle.
Wall Squats: Final Thoughts
Compared to lower-body exercises such as back squats, front squats, deadlifts, and more, wall squats have less joint impact. This means they make a great addition to your training program if you’re new to resistance training or recovering from an injury. Regularly performing wall squats will also help you build strength and size in your legs, and may reduce blood pressure.
When doing wall squats, it’s important to spend some time working out the best foot position for your needs. You don’t want to be too close or far from the wall. Your back should be flat against the wall throughout the exercise, and your weight should be distributed evenly. To make wall squats more challenging, you can hold or place a weight plate or any heavy object on your lap.
Wall Squats: FAQs
What happens if you do wall squats every day?
If you only do wall squats once or twice every day—hold, rest, hold, and then stop—I don’t see this being a problem. At most, you’ll do five minutes of daily leg training, which equals 35 minutes per week. However, if you do more reps than this, I suggest taking a rest day in between so your lower body has time to recover.
How long should you hold a wall squat?
The length of time that you should hold a wall squat depends on how new you are to the exercise. If you’re a beginner, holding for roughly 20 seconds should be sufficient. However, if you’ve been doing wall squats for some time, hold the exercise for 90 seconds or longer. Regardless of your fitness level, aim to add a few more seconds each week.
Do wall squats reduce belly fat?
Wall squats can burn calories, but that doesn’t necessarily mean that regularly doing them will reduce belly fat. For weight loss, the most important thing is being in a calorie deficit. This means that you consume less energy than you burn, and as I mentioned, you can increase the number of calories you burn by doing resistance exercises such as wall squats.
References
- Škarabot J, Cronin N, Strojnik V, Avela J. Bilateral deficit in maximal force production. Eur J Appl Physiol. 2016 Dec;116(11-12):2057-2084. doi: 10.1007/s00421-016-3458-z. Epub 2016 Aug 31. PMID: 27582260.
- Martín-Fuentes I, Oliva-Lozano JM, Muyor JM. Evaluation of the Lower Limb Muscles’ Electromyographic Activity during the Leg Press Exercise and Its Variants: A Systematic Review. Int J Environ Res Public Health. 2020 Jun 27;17(13):4626. doi: 10.3390/ijerph17134626. PMID: 32605065; PMCID: PMC7369968.
- Goldring N, Wiles JD, Coleman D. The effects of isometric wall squat exercise on heart rate and blood pressure in a normotensive population. J Sports Sci. 2014;32(2):129-36. doi: 10.1080/02640414.2013.809471. Epub 2013 Jul 24. PMID: 23879248.
- Bordoni B, Varacallo M. Anatomy, Bony Pelvis and Lower Limb: Thigh Quadriceps Muscle. [Updated 2023 May 8]. In: StatPearls [Internet]. Treasure Island (FL): StatPearls Publishing; 2024 Jan-. Available from: https://www.ncbi.nlm.nih.gov/books/NBK513334/
- Rodgers CD, Raja A. Anatomy, Bony Pelvis and Lower Limb, Hamstring Muscle. [Updated 2023 Apr 1]. In: StatPearls [Internet]. Treasure Island (FL): StatPearls Publishing; 2024 Jan-. Available from: https://www.ncbi.nlm.nih.gov/books/NBK546688/
- Elzanie A, Borger J. Anatomy, Bony Pelvis and Lower Limb, Gluteus Maximus Muscle. [Updated 2023 Apr 1]. In: StatPearls [Internet]. Treasure Island (FL): StatPearls Publishing; 2024 Jan-. Available from: https://www.ncbi.nlm.nih.gov/books/NBK538193/
- Binstead JT, Munjal A, Varacallo M. Anatomy, Bony Pelvis and Lower Limb: Calf. [Updated 2023 May 23]. In: StatPearls [Internet]. Treasure Island (FL): StatPearls Publishing; 2024 Jan-. Available from: https://www.ncbi.nlm.nih.gov/books/NBK459362/
