Few weight room exercises are quite as iconic as the deadlift. The ultimate test of raw strength, it’s picking a weight up from the floor to lockout. Although a staple in strength training, there are many different ways to perform the deadlift, with many things to consider when choosing which deadlift variation will be best for your fitness goals. Some will focus on developing major muscle groups, others building strength or muscle mass, and still others will help increase grip strength.
Here, I’ll break down common deadlift variations, as well as some lesser known ones. You’ll learn the pros and cons of each deadlift exercise and how to perform each one with proper form. Take what works best for your goals, and start hitting those deadlifts in the gym!
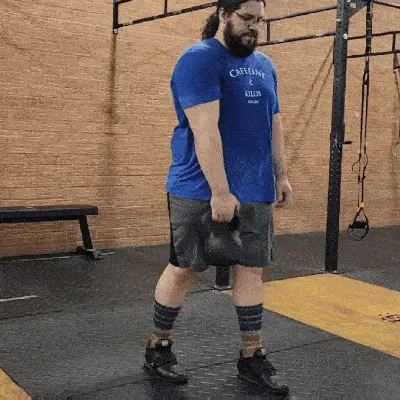
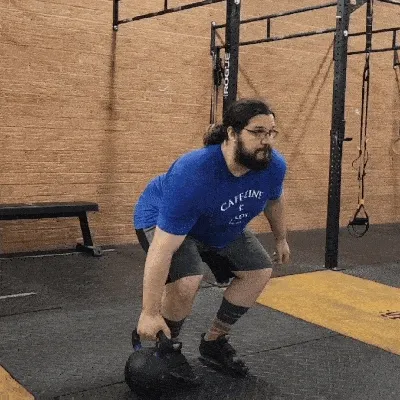
Pick Your Style: Kettlebell, Dumbbell, or Barbell
The deadlift can be performed with different types of weights and loads. The most common are with kettlebells, dumbbells, or a standard barbell; there are advantages and differences in each.
One thing to consider in a deadlift is the height of your start. A barbell with plates is at about shin height, while a kettlebell with a high handle begins slightly higher. A dumbbell will begin lower, forcing you to lower your chest more. For someone new to deadlifts, the higher positions might be easier to work from, while the dumbbell may be a bit more challenging.
Another thing to consider is the weight of the deadlift. Dumbbell or kettlebell deadlifts will naturally be a lighter load, while a barbell can be loaded with considerably more weight. Additionally, the weight displacement of a dumbbell can make the weight more challenging to balance than a kettlebell.
Ultimately, it depends on your goals. For a high-rep exercise, perhaps use the lighter load of a kettlebell or a dumbbell. Use a barbell for heavier loads. Looking for unilateral work? Perhaps a kettlebell deadlift or a variation would work best for you. The best advice I can give anyone is to experiment with different exercises and weights, and see which movements get you the results you want.
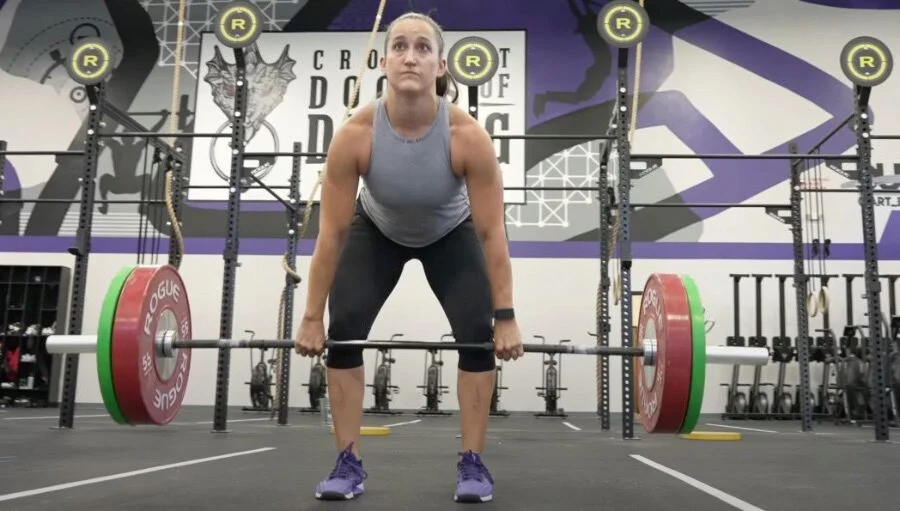
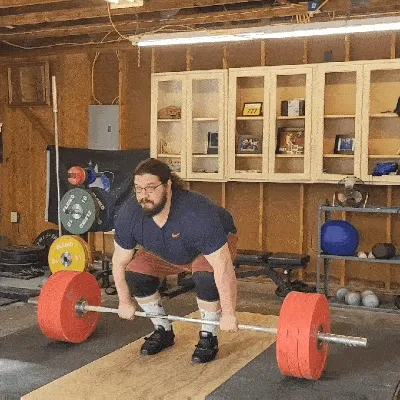
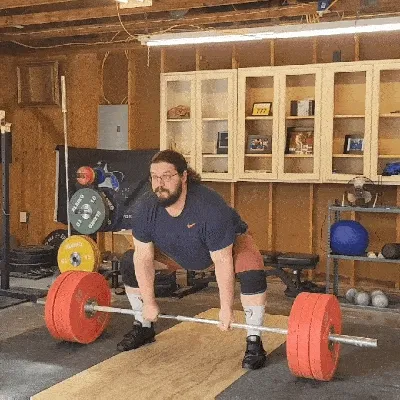
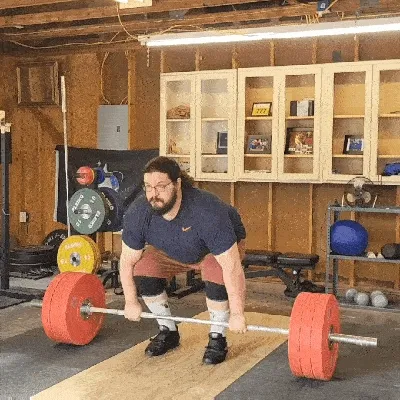
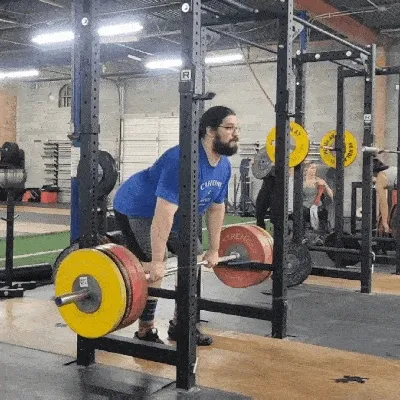
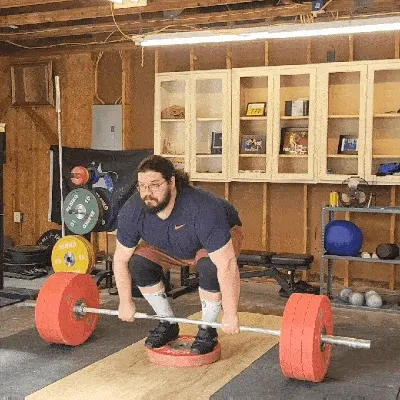
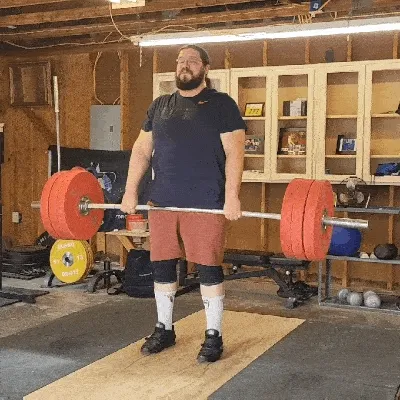
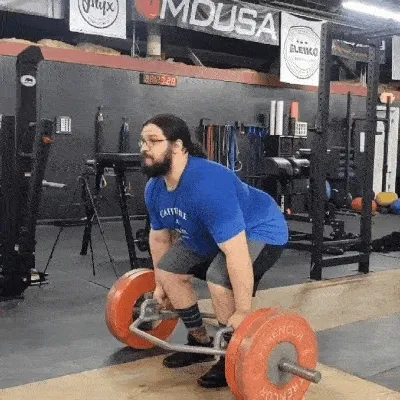
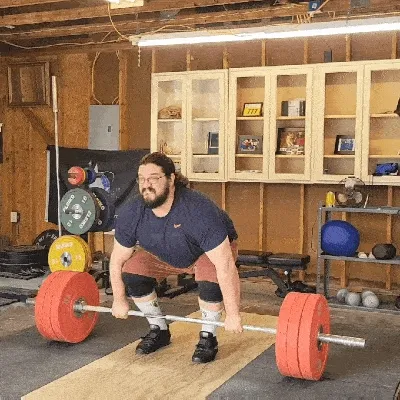
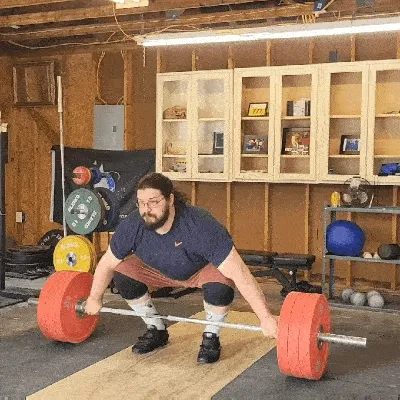
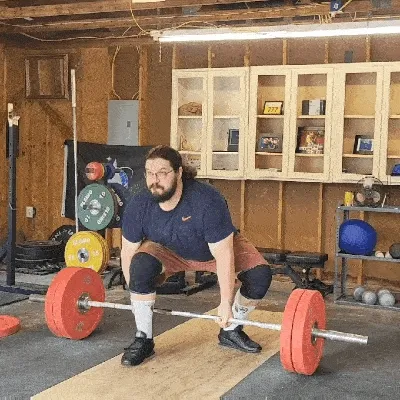
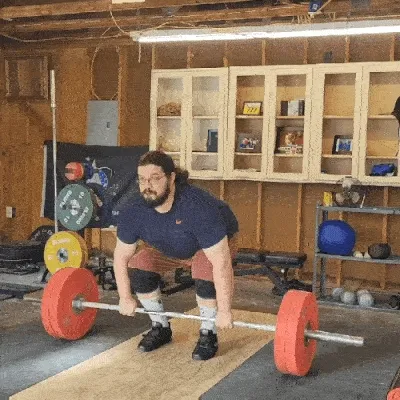
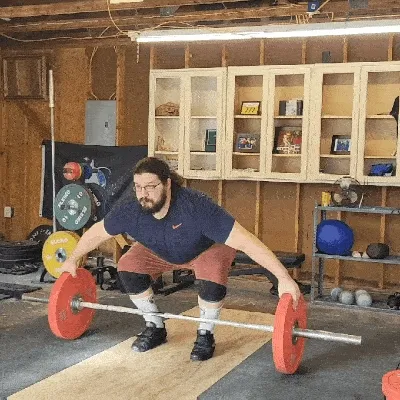
1. Traditional Deadlift
A conventional deadlift is a full-body exercise, meaning it activates and challenges most muscles of the body. Chiefly, it is the ultimate test for hip hinge strength. It attacks the posterior chain, including the glutes, hamstrings, and lower back. Along with this, it challenges grip strength and the upper back and shoulders.
How To Do It:
- Place your feet at about hip-width under the barbell so the bar covers your shoelaces, toes pointed forward.
- Bend over and grip the barbell just outside of hip-width with an overhand grip. You could also use an alternating grip, with one arm underhanded.
- For the starting position, lean over the barbell with the hips set and the back tight. Have the shoulders back and down, keeping the lats active at the start.
- Push through the feet to stand, focusing on firing through the glutes and hamstrings. Stay controlled and keep the back, lower and upper, active throughout. Proceed to stand completely up, holding the barbell the entire movement.
- Bring the barbell back down in a controlled fashion, letting the bar ride down the hips and legs back to the starting position.
Trainer Tip:
It’s common for people to drop the barbell from standing after a successful deadlift rep, or to rush back down. However, I always make sure to control the descent back down, as the negative back to the floor increases time under tension, getting more benefit for your muscles. Additionally, rushing the barbell back down can increase your risk for injury, as you have to relax muscles to move that quickly. Always control the descent; it is safer and gets you more out of your workout.
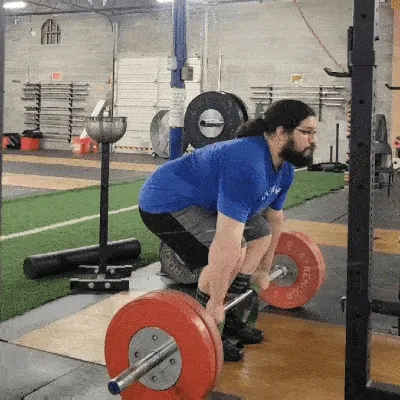
2. Sumo Deadlift
This variation of the conventional deadlift has you use a wider stance—wider than your grip. While the lift trains the same muscles as a standard deadlift, a sumo stance will engage the legs and quads more, and the back a little less. This makes the sumo deadlift a good variation for those working through an injury.
Some competitive powerlifters will say that the sumo deadlift is cheating because the wider stance shortens the range of motion slightly. Regardless of the debate, sumo deadlifts are a great tool to add variety to your program. I’d recommend anyone give these lifts a try.
How To Do It:
- Place your feet wide under the barbell, typically outside shoulder-width, toes pointed outward slightly. Place your grip, overhand or alternating, inside of your stance: keep it inside shoulder-width. The hips will be a little lower, with the chest up more and the back angle a little lower as well.
- Push into the ground to stand, keeping the chest up and driving through the legs.
- Stand tall until the legs are locked out and you are standing upright.
- Return the barbell to the ground, letting the legs bend back to the starting position, while keeping the back and core tight and controlled in your descent.
Trainer Tip:
Try to play around with your stance. A sumo stance is outside of your grip with the feet pointed out slightly; so if your starting position feels awkward, try a wider or closer stance, or adjust your foot angle.
3. Pause Deadlift
In a pause deadlift, the goal is to strengthen weak positions or sticking points throughout the lift. Additionally, a pause deadlift will add more time under tension during the lift, adding challenge and intensity without the need for increasing the load.
How To Do It:
- Place your feet under the barbell at about hip-width. The bar should cover your shoelaces.
- Set up with the hips low and chest up, keeping the back tight.
- Begin pulling up by pushing through the legs, keeping tight in the back.
- Pause the barbell at just below knee height for a 2-second count. Maintain proper positions, staying over the bar and keeping the chest up.
- Finish standing, and then return the barbell to the floor in a controlled fashion.
Trainer Tip:
For more of a challenge, increase the length of time you pause in the deadlift. Typically, a pause lasts for a 2-second count, but I have held pauses for as long as 10 seconds! Remember, however, to adjust the weight accordingly; a longer pause should be done with less weight.
4. Rack Pull
Rack pulls are another method to work past a sticking point in a deadlift. Setting the bar at a height you struggle at allows you to focus just on that part of the movement. You also start from a dead stop; the lack of momentum will allow you to build strength in that position.
How To Do It:
- Set a barbell rack at a height to where the bar sits at just below knee height. This can be adjusted to the height of wherever your specific sticking point is.
- Place your feet under the barbell at hip-width, gripping the barbell in your standard width, just outside your stance.
- Pull from the rack to a standing position, maintaining a strong neutral spine, driving with the legs.
- Pause for a moment at the top, and then bring the bar back down to the starting position on the rack.
Trainer Tip:
Play around with the starting height of a rack pull for different stimuli. Starting at a lower height will increase the time of the lift and therefore make the rack pull more challenging. Also, a higher position will allow for higher loads. You can adjust the height to whatever height or position you find most challenging in a traditional deadlift.
5. Deficit Deadlift
Sometimes, the toughest part of a deadlift is just getting the weights off the ground. Increasing the range of motion can help get you stronger at the lift off portion of the deadlift. Lifting from a deficit also increases time under tension, making this a more challenging deadlift variation.
How To Do It:
- Stand on a barbell plate, with the feet about hip-width. Your feet should be under the barbell so the bar covers your shoelaces.
- Bend over to grip the bar with both hands. The lower bar height due to the deficit will set the hips a little lower, and the chest up a little higher.
- Stand up by pushing through the heels and legs to a standing position.
- Pause at the top, and then return to the starting position, remaining controlled in the descent.
Trainer Tip:
Just like the rack pull height can offer a different stimulus, the height of the deficit can do the same. For more of a challenge, increase the height that you stand from. Use a thicker plate, or even a second plate. Just remember anytime that you scale a deadlift exercise up, make sure to adjust the weight and load accordingly.
6. Romanian Deadlift
The Romanian deadlift, or RDL, is a great exercise to build muscle in the posterior chain, as it tries to emphasize the lower back muscles. In addition to focusing on back and posterior chain strength, reps are done without touching the barbell or weights back to the ground, keeping muscle activation in the upper body the entire set.
How To Do It:
- Stand up with a bar or load like a conventional deadlift, feet hip-width.
- From the top of the deadlift, brace with the core and keep the shoulders back and activated.
- Bend over and lower the bar by shifting the hips backward, keeping the legs mostly straight, only letting them bend to allow for the hips to shift back and to maintain balance.
- Bring the bar as low as comfortably possible without touching the plates to the floor. This will vary person to person, but we are aiming for shin height.
- Once at this position, fire the glutes and hamstrings to bring the weights and yourself back to the starting position.
Trainer Tip:
It’s important to keep the lats and shoulders active throughout a Romanian deadlift. During each set of RDLs, focus on sweeping the bar in, which will keep the lats firing, and the bar close throughout the movement.
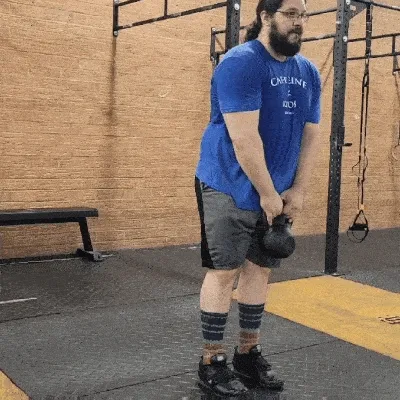
7. Single-Leg Deadlift
As the name implies, the single-leg deadlift focuses on lifting with one leg at a time, allowing for unilateral training: working one leg and one side of the body. Unilateral training lets the lifter focus on functionality and core strength. The deadlift is already a functional exercise, but this variation can help work out muscular imbalances. A 2021 study1 showed that the single-leg deadlift can build the glutes, particularly the gluteus medius, better than a conventional deadlift as well.
In addition to unilateral training, the single-leg deadlift is often done with dumbbells or kettlebells, making it typically an exercise with a lighter load. This makes it great for beginners.
How To Do It:
- Stand with a bar, kettlebell, or dumbbells.
- Lift your right leg off the ground, letting it move back, as you begin shifting the hips back, letting the planted left leg bend slightly at the knees to maintain balance.
- Let the weight in your arms move toward the ground, until nearly touching; your right leg should be nearly parallel to the floor, leg lifted up.
- Pause for a moment and then fire through the left leg to come back to standing.
- Switch legs and repeat.
Trainer Tip:
Just like any deadlift, it’s important to keep muscles active. The same goes for the leg that is up and unloaded. Think of pointing your toes towards your head through the exercise, so the leg remains active.
8. Staggered-Stance Deadlift
A deadlift with a staggered stance is another unilateral deadlift movement like the single-leg deadlift. However, keeping both feet grounded makes it easier for the lifter to remain balanced throughout the lift. This is a great tool for beginners to develop balance leading up to the more challenging single-leg deadlift.
How To Do It:
- Stand with a bar, kettlebell, or dumbbells, keeping a braced neutral spine.
- Step back your right foot about 8 inches. Exactly how far back will vary depending on your height, but most people shouldn’t have more than a foot’s difference between their feet’s positions.
- Let the left leg bend slightly at the knee, and the right leg take most of your weight as you shift the hips back, hinging towards the ground.
- Reach the weights as low to the ground as possible, and then return to standing.
- Alternate legs on the next set.
Trainer Tip:
Because of the unilateral training, this movement is typically done with less weight. This is a great exercise for beginners to build up to the more coordinated single-leg deadlift. Keep these light and at a higher rep count to build more muscle with hypertrophy.
9. Suitcase Deadlift
The suitcase deadlift is another lift that works on unilateral training and functional fitness, by shifting the weight to one side. This will attack the obliques and core, as well as work on preventing rotation with weights.
How To Do It:
- Begin with your feet to the side of your weight: a barbell, kettlebell, or dumbbell.
- Bend down and grip the weight, keeping the chest up.
- Stand up, keeping the chest up and forward, not letting the shoulders drop or rotate towards the weight.
- Once standing, pause one moment, before lowering the weight back down, remaining braced through the core.
Trainer Tip:
Due to the nature of this exercise building stabilizer muscles and core muscles, keep these weights and loads light at first, until you have a handle on proper technique.
10. Trap Bar Deadlift
This deadlift is done with a trap bar, also known as a hex bar: a bar with a hexagonal hole where the athlete stands. The handles on the bar let the lifter pull with a neutral grip instead of the usual overhand grip. The trap bar is set up to have a center of gravity more in-line with the lifter, making it a more comfortable and efficient lift than a conventional deadlift. These adjustments can allow for faster repetitions, according to an October 2017 study.2
How To Do It:
- Stand inside the hexagon of the trap bar and bend over to grip each handle. Lower the hips and raise the chest to your starting position.
- Drive through the feet to stand tall, letting the hips and shoulders rise up simultaneously.
- Pause at the top, and then control the trap bar back to the floor.
Trainer Tip:
Because the trap bar has a center of gravity that is closer to the actual lifter’s center, this can be a great progression to a traditional deadlift. Get comfortable with these first before moving towards the standard deadlift, which shifts the weight slightly forward.
11. Clean Deadlift
A clean deadlift is a barbell deadlift done with a clean grip, used by Olympic weightlifters to mimic and improve positions in the clean pull. It’s similar to a traditional deadlift, there are still some notable differences. For one, the clean deadlift is done with an overhand grip, and the hips tend to start slightly lower. Also, the hips and shoulders rise at the same angle, keeping the bar close and the center of gravity close to the lifter—a necessity in Olympic lifting.
How To Do It:
- Place your feet under the barbell so the bar covers your shoelaces. Your feet should be at hip-width.
- Bend over and grab the bar with an overhand grip, making sure that your grip is the same width as your typical clean—usually just outside shoulder-width.
- Start with the hips a bit lower than a standard deadlift, and chest more upright, and push through the legs towards a standing position, keeping the back tight.
- Try to maintain the back angle as much as possible by keeping the hips and shoulders rising at the same speed.
- Pause at the top, and then control back to the floor, keeping the bar close.
Trainer Tip:
If you don’t use it already, try a hookgrip. Instead of gripping the bar with the thumb over the fingers, try to put the fingers over the thumb. “Hooking” the thumb over will give you a much stronger overhand grip. It’s used in Olympic weightlifting in both competitive lifts. I prefer it over an alternating grip. Then again, I’ve been Olympic lifting for over 20 years; maybe I’m biased, but give it a try!
12. Snatch Grip Deadlift
Much like the clean deadlift, the snatch grip deadlift helps to train positions in its respective Olympic lift. However, the wider grip of the snatch deadlift pulls you to a position that engages the lower back more; the grip keeps the upper back, lats, and forearms working throughout the lift.
How To Do It:
- Place your feet hip-width under the bar, covering your shoelaces.
- Grip the bar with a wide snatch grip; this will have the chest drop a bit more than a typical deadlift.
- Push through the legs to lockout, trying to keep the hips and shoulders rising at the same time.
- Pause once standing for a moment, and then bring the bar back down to your starting position, trying to keep the bar close.
Trainer Tip:
Because of the wider grip, it will be very easy for your lats to get tired; don’t sacrifice proper form though! Keep the lats engaged by thinking of sweeping the bar in during its ascent. Also, try to let the bar trace its way back down the legs on the descent, to keep the lats engaged and to maintain your center of gravity.
13. Banded Deadlift
Using a resistance band during the deadlift increases the tension and load the higher you pull weight up. This can help a lifter strengthen and work past sticking points in the higher points of a deadlift. Keep in mind to adjust the weight according to the amount of resistance the band gives.
How To Do It:
- This will begin with your usual conventional deadlift set-up, but with a resistance band looped around the center of the bar. Step on the band with both feet, keeping the band underneath the center of the foot, so it doesn’t slip out from under you.
- Bend over and grab the bar with both hands.
- Push through the feet using the legs and posterior chain to stand up with the weight. The higher up you go, the more resistance and weight you will feel, so remember to stay engaged!
- Once standing tall, return back to the starting position, remaining controlled and braced throughout the descent.
Trainer Tip:
Move quickly and explosively through these repetitions to develop overall explosive strength and power. Think as you stand to keep the same speed, despite the growing tension on the way up.
14. Jefferson Deadlift
Named after an old circus strongman from the early 1900s, the Jefferson deadlift is one of the more odd start positions of these deadlift variations. You straddle the bar while trying to keep the shoulders forward. This makes it an ideal lift to help fight against rotation of the bar, as this lift naturally puts you in a position to rotate. However, unlike other anti-rotation exercises like a suitcase deadlift, you will be able to lift heavier loads with this lift.
Additionally, this will work the stabilizers of the legs, adductors, and abductors like no other deadlift variation. Straddling the bar also shifts the center of gravity to a position that will be a little more gentle to the back as well.
How To Do It:
- Place one foot over the barbell and one foot behind the barbell, usually rotated outward about 90 degrees.
- Squat and bend over to grip the bar with an alternating grip, the underhand grip outside your feet stance, and the overhand inside your stance.
- Keeping the shoulders and chest forward, push up with the legs to stand, trying to keep the chest up and forward. Minimize any rotation.
- Once standing, pause a moment before returning the barbell to its starting position.
Trainer Tip:
Many people, mostly men, worry about being able to stand up completely without hitting themselves. This shouldn’t be a problem, but just in case, try a more narrow grip or wider stance to shorten the distance to standing.
15. Dorian Deadlift
Named after bodybuilder Dorian Yates, the Dorian deadlift is a variation of the traditional deadlift with the sole purpose of increasing the time under tension each set. Not allowing yourself to rest between reps will keep your shoulders and lats engaged throughout the whole movement, which is a great way to attack the upper back.
How To Do It:
- Begin like a standard deadlift, with feet hip-width under the bar.
- Stand up, pushing through the legs.
- Once standing, begin to lower the weight like a normal deadlift.
- Do NOT bring the bar back to the floor; instead lower it to the shins, before pushing back up to standing.
- Repeat this movement of up and down, keeping the weight off the ground.
- Return the weight to the ground only after the entire set is complete.
Trainer Tip:
The Dorian deadlift is not the same as a Romanian deadlift. Whereas the RDL keeps the knees mostly out of the equation, we want the knees to bend in a Dorian deadlift. This should mimic a traditional deadlift, except for not resting on the ground between reps.
16. Reeves Deadlift
All the strangest deadlifts are named after people; the Reeves deadlift is no exception. Named after bodybuilder and actor Steve Reeves, this deadlift has you using an uncharacteristically wide grip by gripping the plates outside the barbell instead. This will be most challenging on the grip. In addition, the wide grip will engage the shoulders and upper back, making this great for the upper back. Because of the odd grip, I’d recommend starting light before adding substantial weights.
How To Do It:
- Place your feet under the barbell so the bar covers your shoelaces.
- Grip the weight plates outside the barbell, staying bent over the bar and keeping your chest up.
- Push with the legs up, keeping the bar close, until the legs are locked out.
- Pause a moment before returning back to your starting position, staying braced on the descent.
Trainer Tip:
The Reeves deadlift may feel awkward, so consider using a trap bar, as it keeps the weight more in-line with the athlete. Also, if you have multiple weight plates on the bar, separate the inside bumper plate with a 5 or 10-pound plate to allow room for your grip.
Deadlift Variations: Final Thoughts
There are many types of deadlifts and variations within those deadlifts. Each one attacks the legs and back in slightly different ways and for slightly different purposes. Some are better utilized for beginner athletes, while others are better suited for specific sports or athletes.
Regardless of which variation you use, it’s important to remember the importance of a deadlift. For any person, a deadlift focuses on hip hinge strength: the posterior chain firing to lift heavy things up. It’s vital for athletes and everyday life alike. This is a necessary functional movement that should be in anyone’s training program.
Deadlift Variations: Q&A
What is the best deadlift variation?
The best deadlift variation is going to depend on what your goals are. A competitive powerlifter may focus on the conventional deadlift and accessories to work on sticking points in the pull. An Olympic weightlifter will focus on deadlifts specific to the snatch and clean and jerk. Still, someone focused on functional fitness might find the most benefit out of a lighter, unilateral kettlebell exercise, like with a single-leg deadlift.
What is the hardest deadlift variation?
Certain movements will be more challenging for different reasons. The awkward Reeves deadlift will build and attack your grip strength. A deficit deadlift increases the range of motion, making for a more challenging movement than a typical deadlift. Still, a snatch-grip deadlift engages the upper back like few other deadlift variations do.
Which is the easiest deadlift?
Some deadlift variations are great for beginners. A trap bar deadlift can help a lifter get in a more comfortable starting position, with the weights’ center of gravity mimicking the athlete’s. Also, performing a deadlift with kettlebells or dumbbells will help keep loads lighter for a new lifter. Beyond that, a staggered stance deadlift is a great way to develop coordination and balance for the more advanced single-leg deadlift.
How many different types of deadlifts are there?
It’s hard to number exactly how many variations there are. This article lists 16 of the most common deadlift variations, but there are variations beyond this list. Even a simple adjustment like the piece of equipment can change the stimulus of the movement. As long as the movement is focusing on developing the posterior chain, it’s a deadlift that you can benefit from.
References
- Diamant W, Geisler S, Havers T, Knicker A. Comparison of EMG Activity between Single-Leg Deadlift and Conventional Bilateral Deadlift in Trained Amateur Athletes – An Empirical Analysis. Int J Exerc Sci. 2021 Apr 1;14(1):187-201. PMID: 34055137; PMCID: PMC8136577.
- Lake J, Duncan F, Jackson M, Naworynsky D. Effect of a Hexagonal Barbell on the Mechanical Demand of Deadlift Performance. Sports (Basel). 2017 Oct 24;5(4):82. doi: 10.3390/sports5040082. PMID: 29910442; PMCID: PMC5969032.