Introduced by the esteemed Charles Jefferson, a late 19th-century circus strongman, the Jefferson squat is a unique gem in the fitness world. It’s a challenge to find any other gym exercise—besides the Jefferson deadlift and Jefferson curl—that replicates the positions, movement, and muscle activation necessary for this classic lift.
This squat variation has been gaining traction in the bodybuilding community—most notably, pro bodybuilder Kai Greene highly recommends them—because they’ll challenge your lower body, demand stability from your upper body as you resist rotation, and test your grip strength.
RELATED: Bodybuilding Workouts
Tapping into my years as a certified strength and conditioning specialist (CSCS), I advise mastering the barbell back squat and deadlift before adding this move to your exercise arsenal. Why? It requires new levels of strength, stability, and mobility. Just ask my clients and athletes—powerlifting, CrossFit, and weightlifting—how they feel after wrapping up a strength session featuring these bad boys. But don’t worry, I’ve set you up with everything you need to know below to conquer Jefferson squats.
Follow along as I share a full Jefferson squat tutorial, explore alternative approaches and variations, and highlight the many benefits of this strength-defining lift.
How To Do the Jefferson Squat
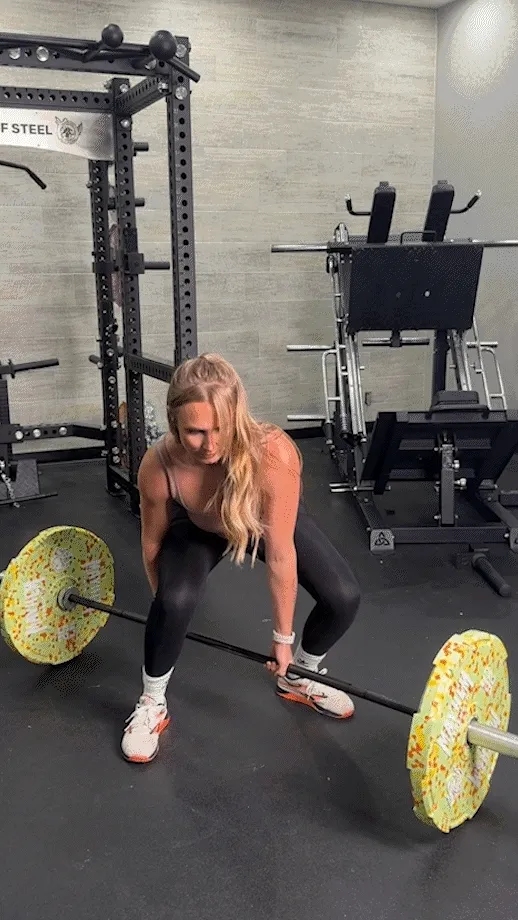
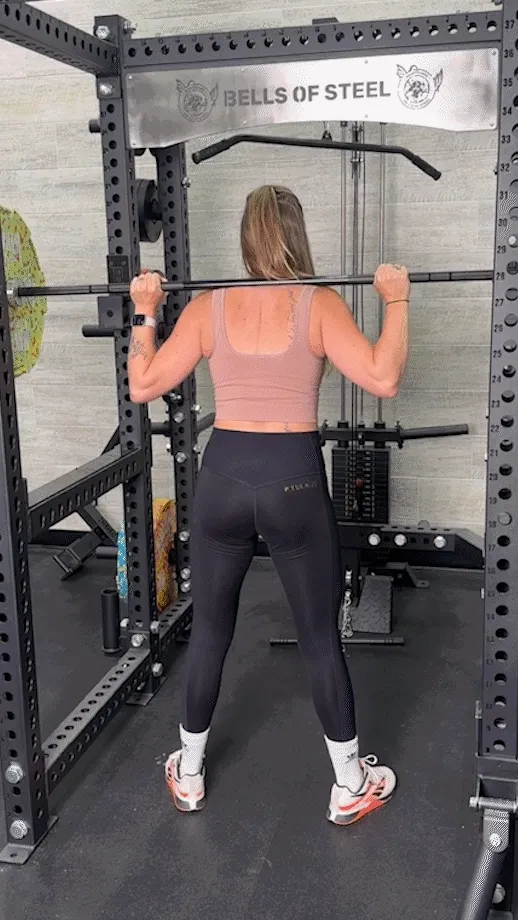
The Jefferson squat is a unique, old-school exercise that works multiple muscle groups simultaneously. To do it, you start by straddling a barbell on the ground like you’re in a sumo squat position. Grab the barbell with both hands in a mixed grip. Then, perform a squat, pushing with your legs to lift the barbell while keeping your core engaged for stability.
How to do it:
- Place a barbell on the ground perpendicular to your body.
- Position your feet in a wide stance, typically wider than shoulder-width apart.
- Straddle the barbell with one foot on each side, mimicking a sumo stance.
- Bend your knees slightly and hinge at your hips to grip the barbell. Grab the barbell with a mixed grip—one hand in front of you and the other behind.
- Lift the barbell by pushing through your feet to straighten your legs.
- Lower back down with control.
- Repeat for your desired number of repetitions, alternating your hand placement.
Expert tip: Position your feet in a stance where your knees are stacked on top of your ankles at the bottom of your squat.
Modifications
- Dial it back: The simple way to dial it back is to lower the load of the barbell. Opting for variations like the dumbbell or kettlebell Jefferson squat may allow you to move through a greater range of motion while decreasing your intensity. You can also perform a sumo squat to get your body used to the wider stance and weight distribution.
- Make it harder: You can load the barbell with heavier weights. You might also integrate partial reps, as they demand increased braking to alter direction. Alternatively, incorporating tempos and pauses can intensify the exercise without adding more weight. Another effective strategy is to enhance your dynamic effort by incorporating resistance bands or chains, amplifying the perceived load at the top of each repetition.
RELATED: Best Olympic Barbells
How To Do Jefferson Squats At Home
A barbell and weight plates are ideal for performing Jefferson squats in your home gym. But if you don’t have those, don’t worry! A pair of the best adjustable dumbbells or best kettlebells work great for the dumbbell or kettlebell variation. And if you’re really short on equipment, you can even use a PVC pipe or a broomstick to mimic a barbell. This way, you can still practice and perfect your form and movement for your next gym session.
RELATED: Home Gym Essentials
Jefferson Squat Variations
- Jefferson deadlift: The Jefferson deadlift starts and stops from the floor like a traditional deadlift while resembling the stance and grip of the Jefferson squat. It enhances asymmetry, rotational and anti-rotational training, heavy loading (when practical), and grip strength.
- Dumbbell Jefferson squat: The lifter assumes the same foot position as the Jefferson squat, but instead of using a barbell, you’ll position two dumbbells, one in front and one behind. Utilize a neutral grip where the head of each dumbbell is pointed toward the body to resemble the position of a barbell Jefferson squat.
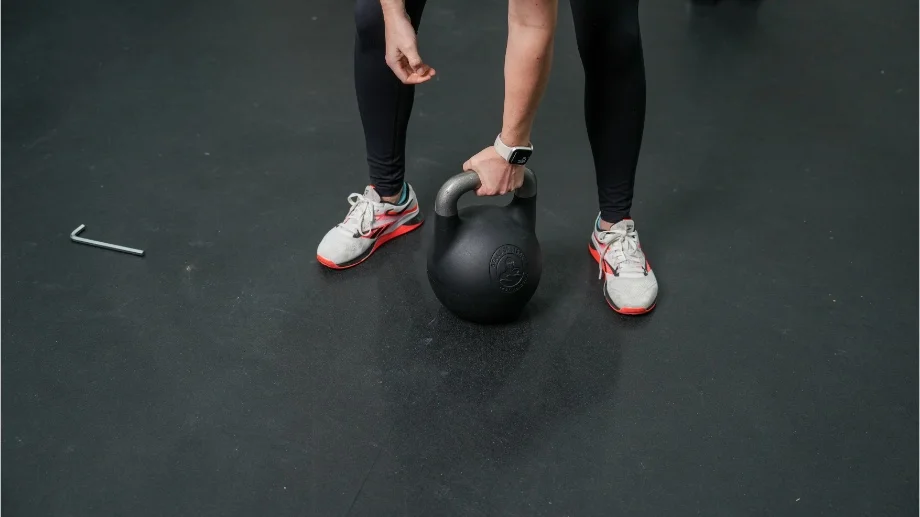
- Kettlebell Jefferson squat: You’ll assume the same foot position as the Jefferson squat, but two kettlebells, one in front and one behind, to resemble the barbell placement. I recommend holding the kettlebells with a neutral grip to achieve a hand position similar to the barbell Jefferson squat.
Jefferson Squat Alternatives
If Jefferson squats seem daunting, here are some alternatives to help you build strength and stability, preparing you for the challenge ahead. I arranged these options from least to most demanding, making it simple to choose the one that aligns with your current fitness level and goals!
Zercher Squat
Why do it: The Zercher squat offers a mobility-friendly option for those with limited movement, specifically in their upper back. Like a front squat, it amplifies the recruitment of the abdominal muscles and quadriceps due to the anterior (front) loading pattern. What truly sets the Zercher squat apart is its ability to teach full-body tension, activating all major muscle groups with each repetition, making it a standout variation in any workout routine.
How to do it:
- Begin by setting up a barbell on a rack at about waist height.
- Stand facing the barbell and position your feet slightly wider than shoulder-width apart.
- Position the barbell in the crooks of your elbows, keeping your elbows tucked in close to your body.
- Stand up straight, ensuring your core is engaged.
- Keep your chest up and eyes forward, and lower yourself into a squat position by bending at your hips and knees.
- Descend until your thighs are parallel to the ground or as low as you can comfortably go.
- Pause briefly at the bottom of the squat, then push through your feet to return to the starting position.
- Repeat for sets and reps.
Expert tip: To lock in your Zercher squat rack position, pull your hands toward your chest and squeeze your ab muscles.
Barbell Back Squat
Why do it: Few exercises in the gym offer the same bang for your buck as back squats. When it comes to leg day, the barbell back squat reigns supreme. It requires full involvement from your lower body while engaging your upper-body muscles to stabilize the weight and protect your spine. This makes it one of the most effective full-body exercises you can do.
How to do it:
- Load your weight, then position your hands on a racked barbell just outside shoulder width.
- Step under the bar, squeeze your traps, and position the barbell against your upper back.
- Take a few steps back from the squat rack, standing firmly with your feet hip-width apart.
- Brace your core, bend your knees, and descend into a squat (aim for 90 degrees).
- Drive through your feet to stand back up.
- Repeat for desired reps then rerack the barbell between sets.
RELATED: Squat Workout
High-Bar Squat
Why do it: Like all squat variations, the high-bar back squat is great for recruiting your quadriceps, glutes, hamstrings, and adductor muscles, making it one of the most renowned movements for developing lower-body strength, power, and size. The high-bar back squat is sneakily successful at improving your hip mobility and the ranges of motion in your ankle and knee joints, according to a June 2020 study in The Open Access Journal for Life & Environment Research1.
How to do it:
- Step under the bar, positioning the barbell on your upper traps.
- Grip it with your hands slightly wider than shoulder-width apart.
- Lift the bar off the rack, stepping back into a stable stance with your feet hip-width apart.
- Pull your shoulder blades down and back to create a tight upper back.
- Keep your chest up and your core engaged throughout the movement.
- Squat down by bending your knees and hips simultaneously.
- Lower until your thighs are at least parallel to the ground.
- Push through your whole foot to stand tall.
- Repeat for desired sets and reps.
RELATED: Best Leg Exercises
Belt Squat
Why do it: Like the Jefferson squat, the belt squat is about taking it easy on your spine by shifting the weight’s position. Try slotting in belt squats earlier in your routine for a strength boost, or smash high-rep sets later to hit hypertrophy and muscular endurance.
How to do it:
- Attach the belt securely around your waist and to the belt squat machine.
- Position your feet hip-width apart.
- Place your hands on the handles if they’re available and brace your core.
- Slowly squat down by bending your knees and hips, keeping your chest up.
- Lower until your thighs are parallel to the ground or slightly below.
- Push through your feet to stand tall and return to the starting position.
- Squeeze your glutes at the top.
- Repeat for desired sets and reps.
RELATED: Titan Fitness Squat Max-MD Review
Benefits of the Jefferson Squat
The Jefferson squat is a one-stop shop for all your muscles. Moving your body through multiple planes of motion leaves no muscle fibers untrained, creating a path to bolster strength and size. Plus, who doesn’t want to add a little variety to their workouts?
Is a Multiplanar Exercise
The Jefferson squat is a unique multiplanar movement, meaning it engages muscles in different planes of motion. By straddling the barbell and gripping it with staggered hands, you challenge your body in various directions, enhancing overall stability, balance, and coordination.
The National Academy of Sports Medicine2 states, “By improving three-dimensional movement, you reduce your risk for injury and are more likely to achieve your fitness (and life) goals.” This distinctive approach prepares you for daily activities and sports demands, making your fitness level more well-rounded.
Helps Improve Leg Strength and Size
If you’re seeking a significant lower-body strength boost, the Jefferson squat could be the answer. It’s particularly good for targeting the quadriceps, hamstrings, and glutes, helping you increase leg strength and size. This leads to more powerful and defined lower-body muscles. The Jefferson squat’s multiplanar nature and unilateral training effect3 ensure balanced muscle development, improving single-leg strength and reducing the risk of imbalances and injuries.
RELATED: Unilateral Exercises
Adds Variety to Lower-Body Workouts
Introducing the Jefferson squat into your workout routine injects a thrilling element of excitement and variety. It can replace exercises such as the RDL or Bulgarian split squats if you want to freshen up your weightlifting workout. Its unconventional setup and movement pattern offers a refreshing change from traditional squat exercises.
Furthermore, experimenting with different hand placements and grip variations can provide additional challenges and keep your workouts engaging and enjoyable. The fun and variety the Jefferson squat brings to your strength training regimen make you more likely to stay motivated and consistent in pursuing your fitness goals.
Jefferson Squat Mistakes
When it’s time to hit the gym and Jefferson squats are on the menu, it’s important to be aware of common mistakes that can hinder your performance, compromise your form, and lead to injury. Here are a few errors to watch out for:
Twisting Your Torso
One of the toughest aspects of multiplanar exercises is stabilizing your core and controlling your torso, so allowing your torso to twist during the Jefferson squat is a no-go. This can strain your spine unnecessarily and reduce the exercise’s potency. Focus on keeping your chest up, shoulders squared, and bracing your core.
Rounding Your Back
Another frequent error is rounding your back, leading to lower back injuries and unattractive form. If you might be the culprit of this mistake, check the following: are you lifting too much weight? Is your foot position and balance in check? Do you have adequate hip mobility? To combat being mistaken for the Hunchback of Notre Dame, ensure you engage your core, maintaining a “neutral” spine throughout the movement, and prep with a solid warm-up routine.
RELATED: Warm-Up Exercises
Feet Lifting Off the Floor
I like to tell my athletes the following about foot pressure when lifting: “You can’t shoot a cannon off a canoe!” This means your feet should stay firmly planted on the ground to ensure proper balance and stability. If your feet lift off the floor, it indicates a lack of control and can lead to instability and poor form. A good cue is to “push the ground away” with your front foot as you break the bar from the floor and ensure your back leg is strongly anchored to the ground.
Muscles Worked by the Jefferson Squat
Understanding the muscles worked in the Jefferson Squat is vital to getting the most out of your workouts and solidifying your technique. This exercise hits multiple muscle groups, giving you a well-rounded lower body and core workout.
- Quadriceps4: The quadriceps are the primary movers during the squat phase, extending the knee as you rise. They’re important for stabilizing the knee joint and supporting the body’s weight.
- Glutes5: The gluteal muscles are engaged to extend the hip and drive the body upward. Strong glutes are essential for powerful leg movements and overall lower-body strength.
- Hamstrings6: The hamstrings assist in hip extension and provide stability to the knee joint. They work eccentrically to control the descent and concentrically to help propel the body upward.
- Adductors7: The adductors (inner thigh muscles) help stabilize the legs and maintain balance during the Jefferson squat’s asymmetric stance. They also contribute to hip adduction, which is critical for proper alignment.
- Core8: The core muscles, including the rectus abdominis, obliques, and transverse abdominis, stabilize the spine and maintain proper posture throughout the movement. A strong core prevents excessive lumbar flexion (rounding of your back) and aids in overall balance.
- Erector Spinae9: The erector spinae muscles run along the spine and help to keep the torso upright and maintain spinal alignment. They’re crucial for preventing lower-back rounding and ensuring a safe lift.
- Latissimus Dorsi10: The latissimus dorsi muscles maintain a firm grip on the bar and stabilize the upper body. They help steady the torso, reduce unwanted rotation, and ensure a smooth lift.
Jefferson Squat: Final Thoughts
I hope this Jefferson squat exercise guide has shown the whys and hows of this unique lower-body movement that can help you harness the effects of asymmetry training to enhance strength, stability, and size.
Here’s a brief overview as to why the Jefferson squat is a mighty move to master:
- The Jefferson squat targets multiple muscle groups, making it a formidable full-body exercise.
- It’s a multi-plane exercise, moving the body through various planes of motion: frontal (side-to-side or lateral), sagittal (up-and-down or front-to-back), and transverse (rotational or anti-rotational)
- The Jefferson squat is effective in building lower-body strength and size.
- Avoid common mistakes, such as allowing your torso to twist, rounding your back, or not keeping your feet planted firmly.
- If your movement quality isn’t up to par or you don’t have access to a barbell and weight plates, use alternatives and variations.
Jefferson Squat: FAQs
How does a Jefferson squat work?
A Jefferson squat involves standing over the barbell with one foot in front and one foot behind, then lifting the bar with a switch grip. This unique stance helps distribute the weight more evenly and engages various muscle groups, including your quads, glutes, hamstrings, adductors, core muscles, spinal erectors, and lats.
Are Jefferson squats safe?
The Jefferson squat can be a safe and effective exercise with proper form and an appropriate weight. The unique stance of this squat can help reduce stress on the lower back, making it a suitable option for those with back pain. However, it’s important to remember that, like any exercise, starting with a manageable weight is crucial, as is maintaining good posture and progressing gradually to avoid injury. By following these safety precautions, you can enjoy the benefits of Jefferson squats without compromising your safety.
My advice as a certified strength and conditioning specialist? Master the barbell back squat and deadlift before giving the Jefferson squat a try.
What’s a good weight for Jefferson squat?
A good starting weight for the Jefferson squat really depends on your strength and experience. If you’re just starting, it’s best to go with a lighter weight to focus on getting your form right. Usually, starting with just the barbell for a few warm-up sets and then progressing to a light load is a good idea.
I advise increasing the weight by 3% to 5% weekly. Form over weight—always!
References
- Murawa, Michal et al. “Muscle activation varies between high-bar and low-bar back squat.” PeerJ vol. 8 e9256. 8 Jun. 2020, doi:10.7717/peerj.9256
- Payne, Andrew. “Sagittal, Frontal and Transverse Body Planes: Exercises & Movements.” NASM Blog, National Academy of Sports Medicine, 10 May 2023, blog.nasm.org/exercise-programming/sagittal-frontal-traverse-planes-explained-with-exercises?utm_source=blog&utm_medium=referral&utm_campaign=organic&utm_content=ReasonsToBecomeCES. Accessed 16 May 2024.
- Zhang, Wenfeng et al. “Effect of unilateral training and bilateral training on physical performance: A meta-analysis.” Frontiers in physiology vol. 14 1128250. 13 Apr. 2023, doi:10.3389/fphys.2023.1128250
- Kenhub. “Quadriceps.” Kenhub, https://www.kenhub.com/en/library/anatomy/the-quadriceps-femoris-muscle Accessed 16 May 2024.
- Kenhub. “Gluteal Muscles.” Kenhub, https://www.kenhub.com/en/library/anatomy/gluteal-muscles Accessed 16 May 2024.
- Kenhub. “Posterior Thigh Muscles.” Kenhub, https://www.kenhub.com/en/library/anatomy/posterior-thigh-muscles Accessed 16 May 2024.
- Kenhub. “The Hip Adductors.” Kenhub, https://www.kenhub.com/en/library/anatomy/the-hip-adductors Accessed 16 May 2024.
- Kenhub. “Anterior Abdominal Muscles.” Kenhub, https://www.kenhub.com/en/library/anatomy/anterior-abdominal-muscles Accessed 16 May 2024.
- Kenhub. “Erector Spinae Muscles.” Kenhub, https://www.kenhub.com/en/library/anatomy/erector-spinae-muscles Accessed 16 May 2024.
- Kenhub. “Latissimus Dorsi.” Kenhub, https://www.kenhub.com/en/library/anatomy/latissimus-dorsi-muscle Accessed 16 May 2024.