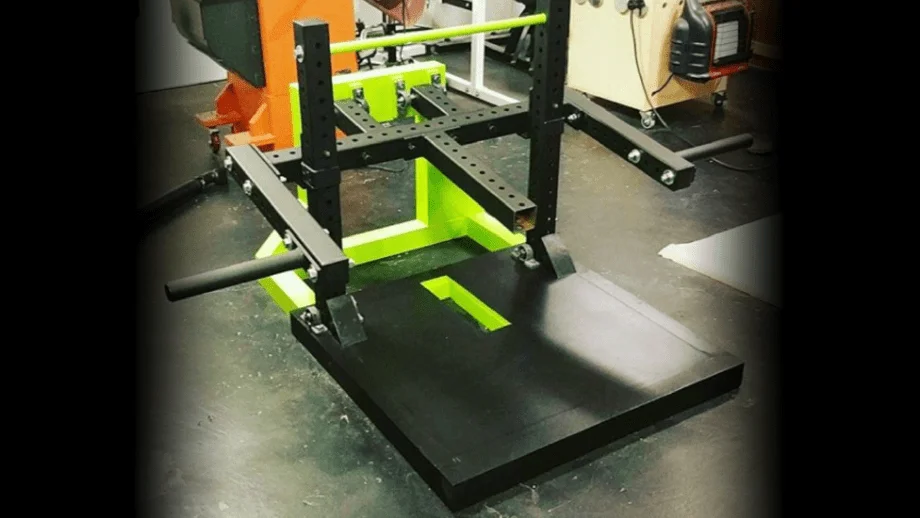
The Belt Squat Machine is one of the most coveted pieces of gym equipment available today. Although there are many options, including those made by Westside Barbell, Pit Shark, Matt Wenning, and others, they’re all pretty pricey. This DIY Belt Squat Machine requires no special skills and costs well under any other available options.
What is a Belt Squat Machine?
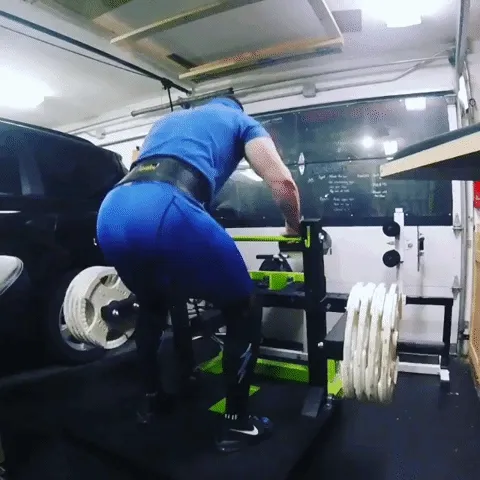
The belt squat machine is a great tool to have in your arsenal. It provides an easy way to add volume on squats without putting extra stress on your back and other supporting muscles.
Rather than the load being placed on your spine while doing a back squat using a barbell, the belt squat allows the load to be placed on the hips. In addition to relieving stress on the back associated with the barbell back squat, it also provides traction to the spine while allowing you to add substantial volume to your legs. One of the unique things about the belt squat is that it also has many other uses as well.
It is great for calf raises, especially for those lacking space, such as a home gym. There are also endless variations of rows and shrugs that can be performed, including deadlifts.
Without question, the belt squat machine is one of the most versatile pieces of equipment you could build.
Supplies
Parts from Rogue Fitness
- (2) XML-43 Monster Lite 3x3x43″ Crossmember Pair
- XML-24 Monster Lite 3x3x24″ Crossmember Pair
- XML-36A Monster Lite 36″ Extension Kit (includes bolts)
- Monster Lite J-Cups
- SP3358 Monster Lite Plate Storage Pair – Long
Parts from Hardware Store
- (4) 4x4x8 untreated lumber (treated lumber will warp overtime)
- (6) 5/8″ Pillow Block Bearing UCP202-10 (Amazon.com)
- 4’x4’ sheet ¾” plywood (preferably hardwood)
- (4) ½” x 6” Lag Bolts
- (2) ½” x 10” Lag Bolts
- (8) ½” x 5 ½” Hex Bolts
- (8) ½” Nylon Lock Nuts
- (8) ½” Washer
- (8) ½” x 2” Lag Bolts
- 5/8” x 36” Steel Rod
- 5/8” x 36” Threaded Rod
- 3/4” x 36” Iron Pipe
- 2 ½” pocket hole screws
- Wood Glue (Titebond III was used)
- JB KwikWeld
Tools
- Miter Saw
- Metal Cutting Band Saw (check harbor freight or garage sales)
- Note: You could also get away with a handsaw, it would just take more time.
- Power Drill
- Impact Driver
- Pocket Hole Jig
- 1/2” Drill Bit
- 7/8” Drill Bit
- Adjustable Wrench
- 3/4 wrench
- 15/16 wrench
- Jig Saw (Optional)
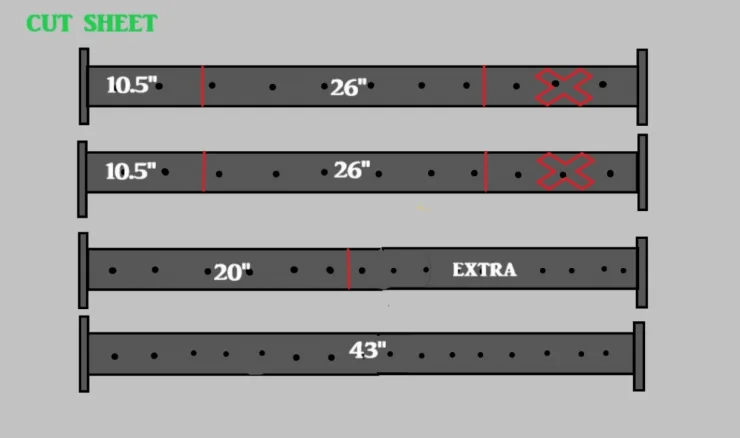
Cut Sheet Diagrams
Rogue Fitness Crossmembers
Wood
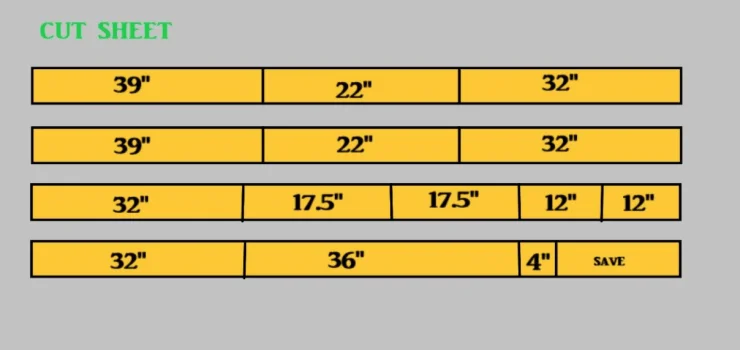
Note: Be sure to refer back to these images when making cuts.
Build Instructions
The first step is to cut out the crossmembers with a bandsaw or some other metal-cutting tool, such as a handsaw. Wood is cheap if you mess up but, these Rogue Crossmembers are not.
Make sure you measure twice and make cuts in the right order, or your holes won’t line up. Refer to the cut sheet above.
1. Cutting Crossmembers
- Make 10.5” cuts from end of 43” crossmembers
- Make 26” cuts measuring from where you just made the 10.5” cuts
- Then make your 20” cut from your third crossmember
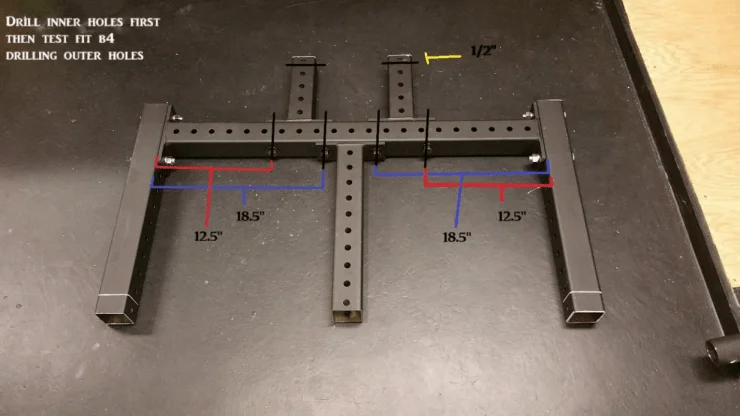
2. Drill holes in the 43” Crossmember to mount your cut pieces to
- Drill Four total 5/8” holes
- Center your 20” piece and mark your holes
- Start with a 1/4” drill bit and move up to the 5/8”
- Be careful to drill your holes as straight as possible
- If you end up being off a little bit, use a unibit to widen the holes
- After inner two holes are drilled test fit your pieces and drill outer holes
- See pictures for guidance
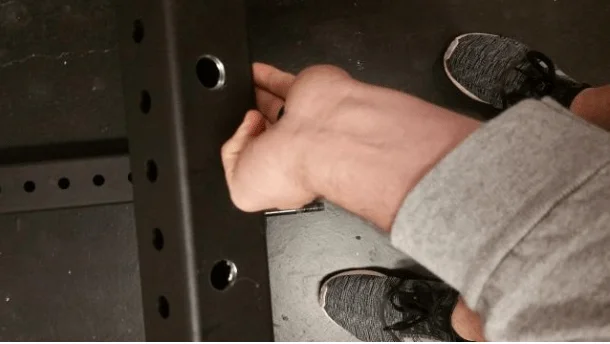
3.Drill 5/8” holes in the sides of your 10.5” pieces
- Start holes about 1/2” from the cut edge of the crossmember
4. Assembly of Crossmembers
- Assemble the pieces you have cut accordingto the picture below. Using (8) 5/8”x 4-1/2” Bolts included with the extension kit
- Once everything is test fit, then tighten.
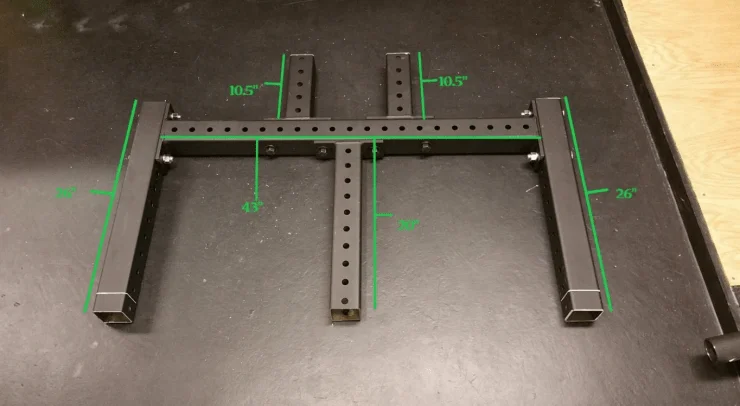
Once these steps have been completed, the most difficult work is behind us. It is important to drill the holes straight and keep everything as square as possible. If you’re off by a little, it should be okay, but the more straight the holes, the better off you’ll be.
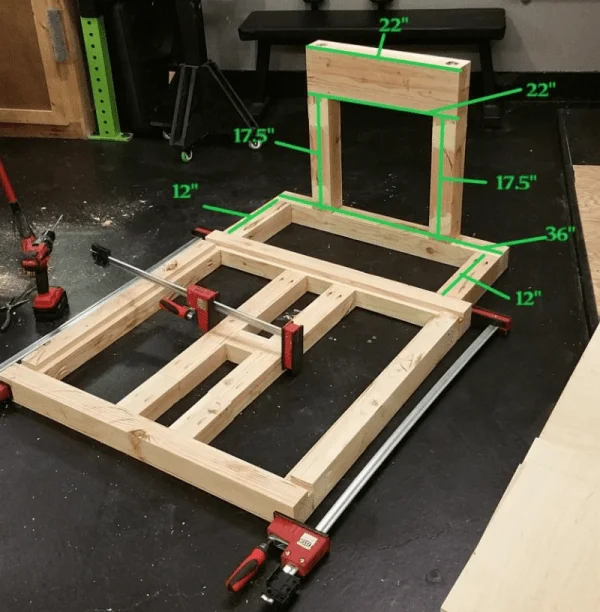
5. Base Construction
- Make the cuts for the base. Refer to the cut sheet diagram for exact cuts
- Make sure to make your cuts in the order shown in the picture
- After cuts, write the length of each piece on the end to prevent any confusion
- Set the save piece aside, it will be used for a later step
6. Base Assembly
- Edge glue your 22” 4×4 sections together.
- Use plenty of glue and clamp together for at least 24hours. No screws will be required you will be adding lag bolts later.
- Allow the glue to set overnight
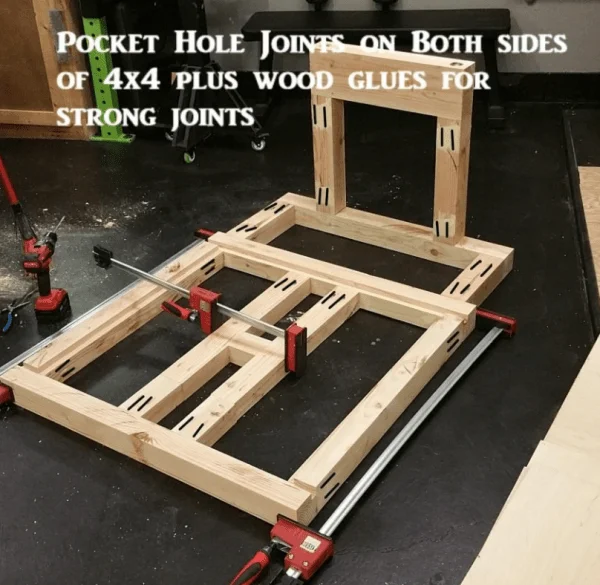
- Using a pocket hole jig, drill holes for 2.5” pocket hole screws in each end of the front and back of your 17.5” pieces.
- Attach 17.5” pieces to your glued 22” piece using pocket hole screws and wood glue. (use glue at every wood joint)
- Attach the 36” piece to the other ends of your 17.5” pieces
- Make sure to center the 36” piece before attaching, 7” from outside edges
- Using a pocket hole jig (Kreg Jig) drill holes for 2.5” pocket hole screws in each end and in the front and back of your 12” pieces
- Attach your 12” pieces to the ends of the 36” piece using 2-1/2” pocket hole screws and wood glue
- Using a pocket hole jig (Kregg Jig) drill holes for 2.5” pocket hole screws in each end and in the front and back of all 4 32” pieces
- Attach these to the ends of 39” pieces with 2-1/2” pocket hole screws and wood glue, creating a square base
- Insert the other two 32” pieces each 2” from center creating a 4” gap
- Attach these boards with 2-1/2” pocket hole screws and glue
- Glue your 4” piece, 14” from front of platform
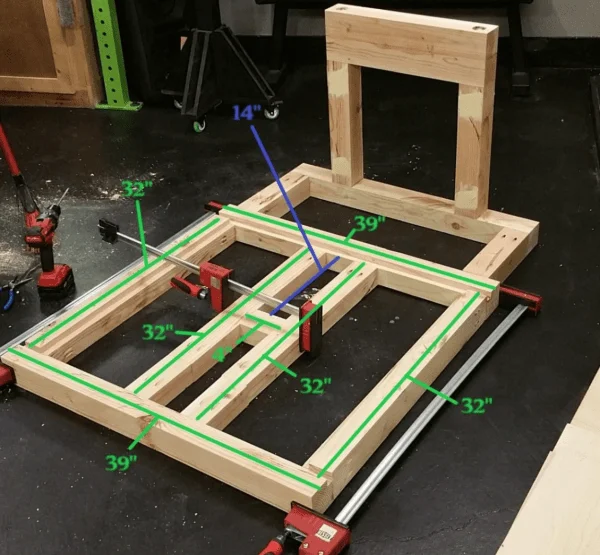
- Attach your square base to the upright portion using 2-1/2” pocket hole screws and wood glue
7. Platform
- From your 4’ x 4’ cut your plywood to fit over your 4×4 base.
- It should be 39” x 39.5” but measure to be sure
- Note: If you don’t have the tools to do this most hardware stores will make these cuts for you
- With a jigsaw, cut a 4” x 17.5” rectangle from the center of one side of your plywood
- Note: This will allow the beam to travel a couple more inches
- Note: This is optional as with 45s on the plates will hit the floor before the beam does. This is why I have not added any safeties as the plates contact the floor before I would be in danger of injury.
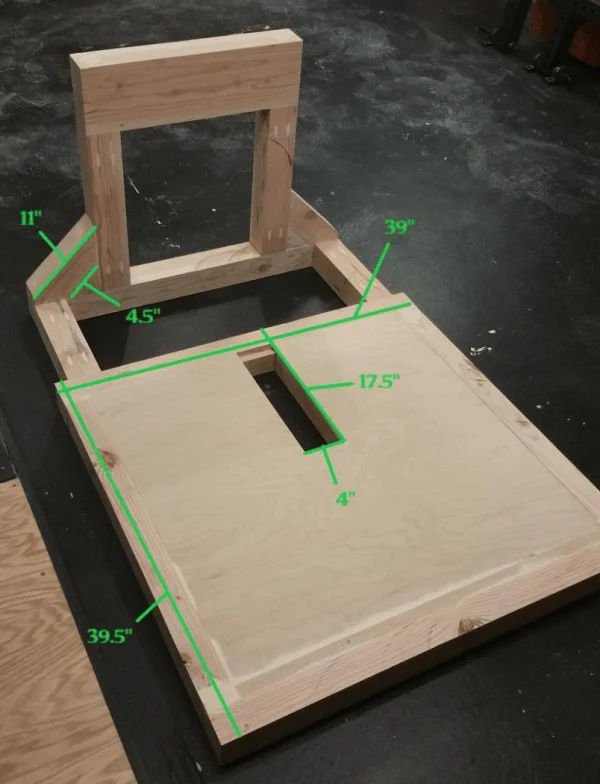
8. Supports
- Cut (2) 4” pieces and (2) 11” pieces
- Cut a 45-degree angle on each side of these pieces
- Attach at edge of upright with wood glue and standard screws
- The 11” pieces will need to be trimmed to be flush with the edge
- Note: The base should now be complete
9. Bearings
- From your 5/8” steel rod, cut (4) 7” pieces
- Feed the (2) 7” rods through a bearing, then through the crossmember, and finally through the next bearing.
- Make sure there is enough space for the crossmember to move between the bearings, then tighten the bearing set screws with an Allen Wrench
- With the same process add bearings to the lowest holes of the 36” extension kit beams
- Add a bead of JBKwikWeld wherever the steel rods and crossmembers meet. This ensures that the unit rotates on the bearing and not on the steel rod.
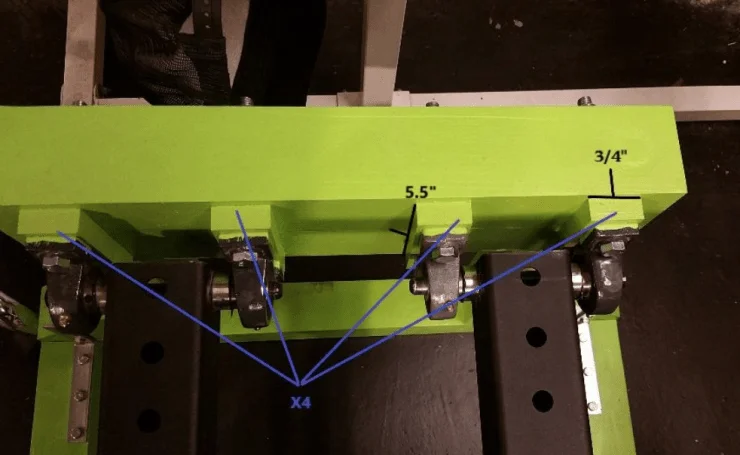
10. Cutting the Extensions
- Depending on how close your holes on your crossmembers were to the edge, you may need to add some wood spacers.
- With your bearings sitting flush on the floor, you should be able to move the unit freely. If it contacts the ground the spacers will be needed
- Note: This does not apply to the extensions uprights, as we actually want them to contact the ground
- I needed to add (4) 5.5” x 3/4” pieces of plywood under the four bearings to get my clearance
- Once these are cut center them on each bearing and mark your holes
- Drill 1/2” holes and set these aside until finally assembly
11. Lag Bolts
- Pre-drill 1/2” holes for the lag bolts
- Note: I have countersunk mine for aesthetic purposes but it is only required on the bottom two
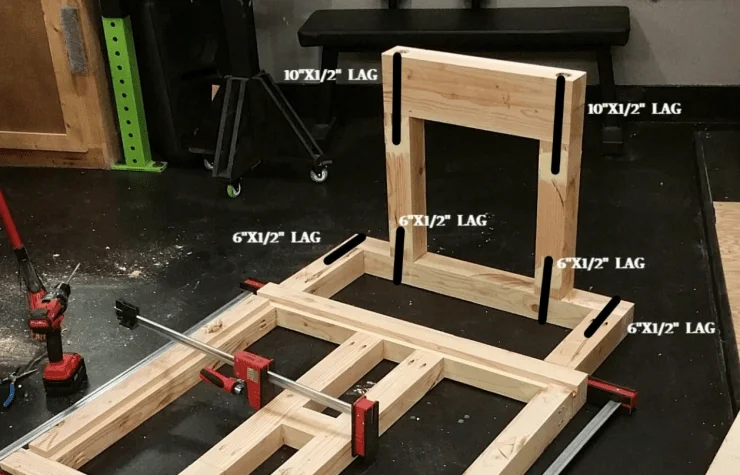
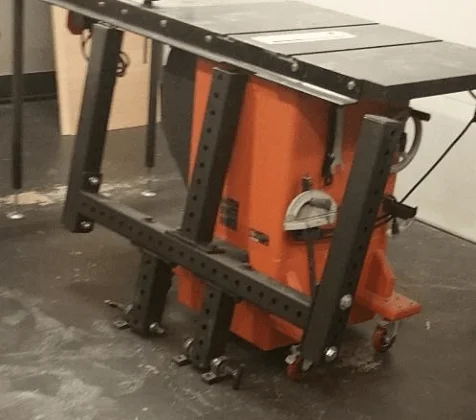
12. Assembly
- Set your base on its back so the platform is standing up
- Place crossmembers with bearings on the 22” boards that were glued together
- Center and square up the crossmember, then mark the holes through the bearings
- Remove crossmember and drill 1/2″ holes
- Set your crossmember over holes (add spacers if you needed them)
- Put your 1/2″ x 5-1/2” bolts through the holes then stand the unit up
- Note: You may require extra help here
- Add 1/2″ washers and lock nuts to the back side and tighten

13. Upright Assembly
- Hold the crossmember level
- Note: You may require extra help for this step
- Bring your uprights with bearings attached and get them square with uprights at the edges of the platform
- Mark the holes for the bearing mounts and pre-drill
- Attach with 1/2” x 2” Lag bolts
- Note: Be sure that outer lag bolts bite into 4×4,not plywood
- Measure the space between the two uprights and cut your 3/4″ x 36” iron pipe to fit in between
- Run the 5/8” all tread through the uprights and the pipe
- Add nuts and washer at each end and tighten
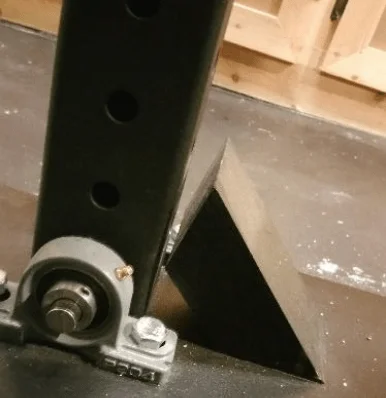
14. Stoppers
- Your uprights are naturally going to stop at a good point when they make contact with the platform
- Note:These stoppers strengthen that point of contact to make sure you can put weight on the uprights
- Start with a 4×4 scrap with 45-degree cuts at both sides
- Set your uprights back to the working position
- Using a protractor or similar device find the angle that it sets back at
- Cut this angle off one of your 45-degree edges
15. Trimming the J-Cups
- Simply cut off the angled part of the J-Cup so it has a flat racking surface
- Attach J-cups to uprights and position crossmember at desired heights
- Note: This step is not necessary, but it gave me a much better rack position
16. Final Steps
- Attach your Plate storage posts using supplied hardware
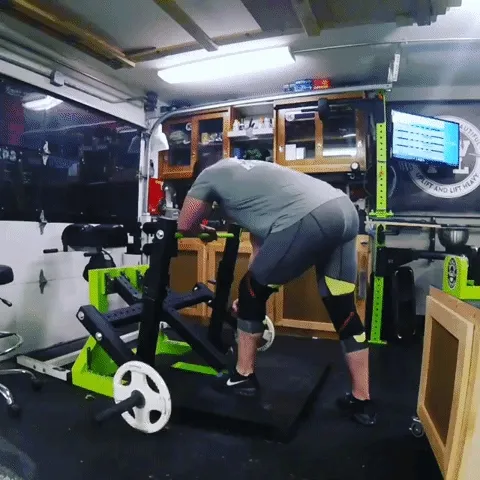
- It is completed now…
- Squat, squat, and squat some more
- Get major gains
- Get creative with new uses
Ways to Save Money During Build
There are several places that corners can be cut to save some money.
The biggest one is the extension kit for the uprights. If you don’t care about it being adjustable, there is no reason that you couldn’t make them out of 4x4s. Giving up adjustability would save you from having to buy the extension kit and J-cups. That’s a savings of over $245.
If you or someone you know can weld, this could be made for close to half the price. Using crossmembers and uprights from other companies also offers potential cost savings.
Finally, the uprights don’t really need bearings. It would be pretty simple and cheap to design another way for it to pivot, but this was the easiest option.
Tips & Tricks
First of all, this unit will not be identical to mine as I tried to simplify some steps and improve upon others.
I countersunk all lags and screws and filled all screw, lag, and pocket holes with wood filler. I then sanded the entire thing and painted it. This is a worthwhile step if you want it to look clean and professional. I also rabbited the 4x4s on the outside of my base and cut my plywood to sit inside the rabbited boards. This makes it look cleaner and hides all the plywoodedges. I did not include this step because not everyone has these tools and it likely decreases the strength of the platform.
Other things you can do is add 3×3 plastic end caps to make it look finished. Also take 3 in1 oil, sandpaper, and then steel wool to your iron pipe before painting, otherwise, the rust will bleed through your paint. For those interested, I used parakeet green paint from Valspar which matched my green Rogue RML-490C exactly.
I also used a Kreg Jig for my pocket hole joints, and, if you are a DIYer, it will come in handy over and over again.
I am quite certain someone can come up with a better idea for the stoppers. If you do, please let us know in the comments.
Finally, I have squatted up to 500 pounds on this unit so far. After the 500-pound squat, I decided to add some L brackets from Lowes where the base meets and goes up. Obviously, 4×4 construction is not as strong as steel. If you want to go another step in strengthening the unit, I have an idea. Add eye bolts to the base and outside bearings, and tension them with wire rope. This would pretty much guarantee that your belt squat will handle anything you throw at it.