The Reverse Hyper is one of the most coveted pieces of equipment in any gym. In this Do-It-Yourself Tutorial, we’ll show you how to make your own DIY Reverse Hyperextension Machine for less than $100.
What is a Reverse Hyper?
Lower back pain is one of the most common problems facing the average office worker (which is a large part of the U.S Workforce.) Having to sit in a chair all day, hunched over your computer or phone leads to poor posture, tight hips, spine rigidity, and eventually debilitating pain.
The Reverse Hyper is the machine created by famed strength coach, inventor, and author Louie Simmons of Westside Barbell. After multiple broken vertebrae during his stint as a world-record-breaking powerlifter, Louie invented the Reverse Hyper Machine to help himself rehab back to top-level form and step back on the platform.
Louie Simmons invented the Reverse Hyper to strengthen the posterior chain by targeting the glutes, hamstrings, and lower back. By decompressing the spine without enacting any vertical compression, the Reverse Hyper is able to increase dynamic strength development in the concentric phase of the movement. Throughout the swing, the spine is stretched and depressurized, ultimately filling the spinal column with fluid and the lower back muscles with blood.
Although we often see the Reverse Hyper used in strength training facilities, it’s also found in rehab facilities, chiropractor’s offices, and physical therapy centers all over the world. It is truly one of the best strength and rehab machines available.
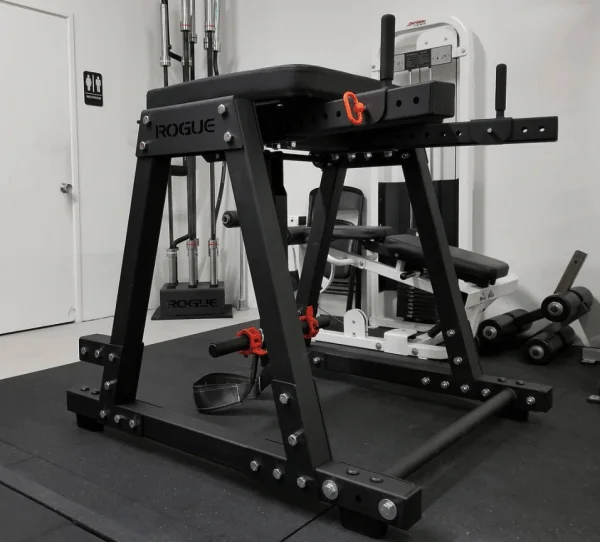
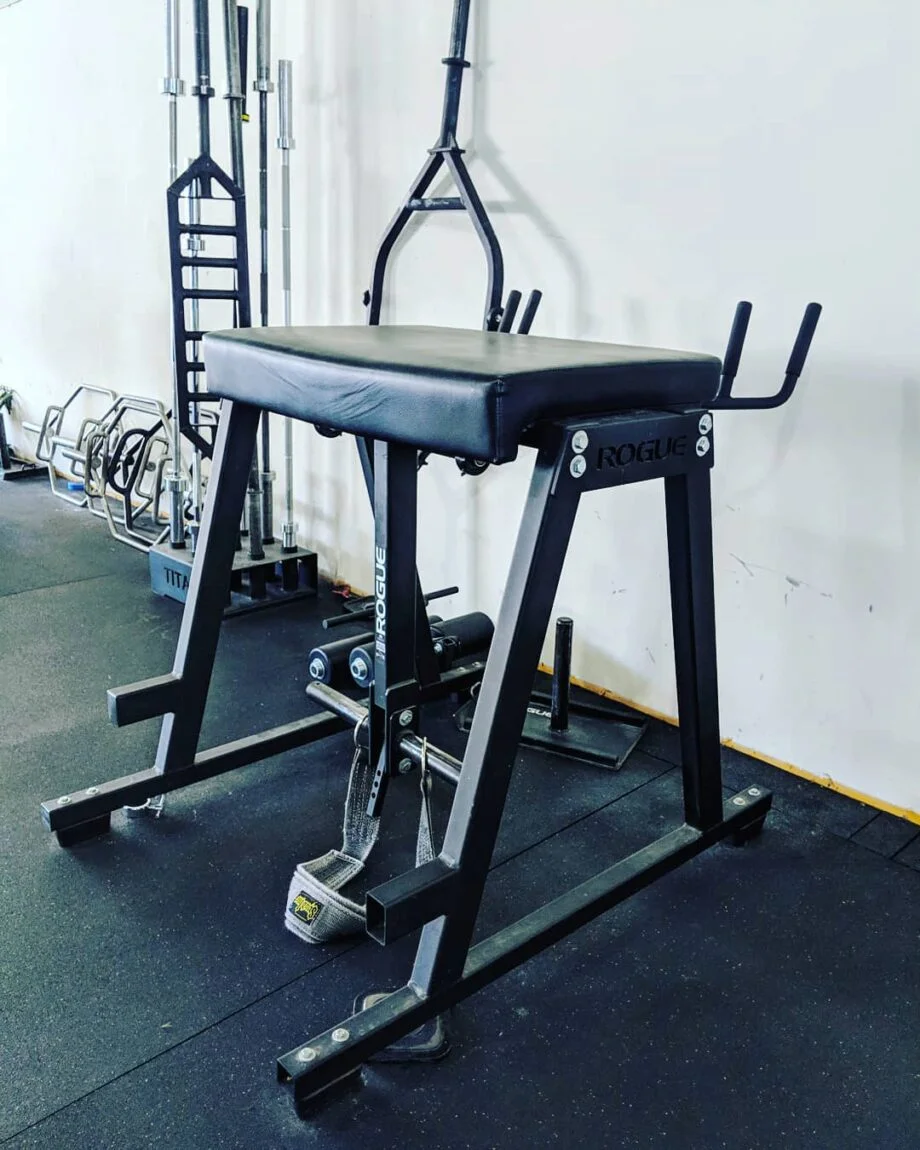
Rogue Fitness
Rogue RH-2 Reverse Hyper
Product Highlights
Pros & Cons
Pros
- The Rogue RH-2 Reverse Hyper, simply put, is one of the best value reverse hypers on the market
- The RH-2, like all Rogue equipment, is a solid and well-made piece of equipment. Like one reviewer states, “As with most (all?) Rogue equipment, the RH-2 is a well-made beast.”
- The powder coat finish is traditional matte black that blends well with the rest of Rogue’s equipment.
- Compatible with all increments of bumper and steel plates.
- It’s the perfect rehab machine for lifters who have injured their back, hamstrings, or other muscles in their core as it both stretches and strengthens those muscles.
- Rogue is one of the very few companies to have direct permission from Louie Simmons, creator of the reverse hyper, to manufacture this machine and the RH-2 is the best of the Rogue offerings.
- A 3-inch thick pad wide enough for even the largest of lifters make the RH-2 both comfortable and user-friendly.
- The RH-2 is shipped quickly, arrives quickly, and comes fully assembled to your home or commercial gym.
- Doubles as an excellent stand-up desk when not being used. We’re kind of joking, but not really.
Cons
- It’s expensive for a machine that is used primarily for rehab and stretching.
- At over 200 pounds, it’s difficult to move.
- One reviewer commented that the powder coating was rough making it difficult to clean and keep looking nice.
Bottom Line
The Rogue RH-2 is one of the best value reverse hypers on the market and one of the only ones endorsed by the creator of the reverse hyper, Louie Simmons. The quality of construction, ease of use, maneuverability, and price all make the RH-2 worth it if you plan to use it. However, if you’re in a garage gym setting, understand that a reverse hyper takes up a lot of space and should only be bought if its use is justified.
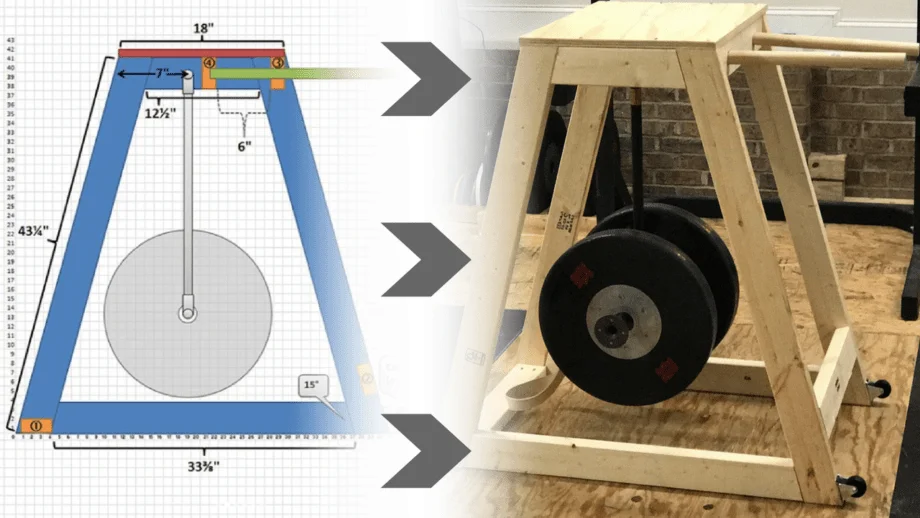
Diagrams

This is the front of the DIY Reverse Hyper.
Modifications can be made, but all of the dimensions are designed to accommodate most people.
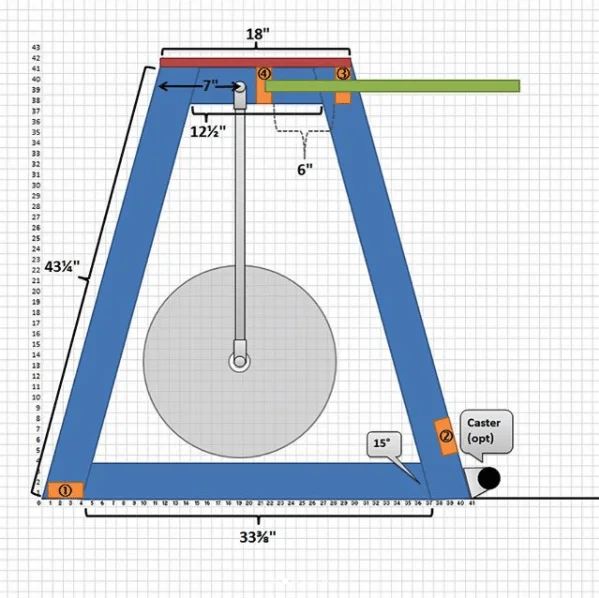
This is the side of the DIY Reverse Hyper Machine.
As you can see on the front, there is an option to use casters to allow for easy movement of the machine. Due to the construction, it’s much lighter than made-to-order versions, yet still has quite a bit of rigidity for the materials used.
Supplies
- (4) 2″x4″x8
- (1) 2″x2′ 3/4 PLYWOOD
- (2) 8″ 3/4 BLACK IRON PIPE
- (2) 10″ 3/4 BLACK IRON PIPE
- (1) 24″ 3/4 BLACK IRON PIPE
- (2) 3/4 T-JUNCTIONS
- (2) 3/4 FLANGES
- (1) 4′ 1.25″ WOOD DOWEL
- (1) BOX OF 50 2.5″ POCKET HOLE SCREWS
- (2) FIXED WHEEL CASTERS
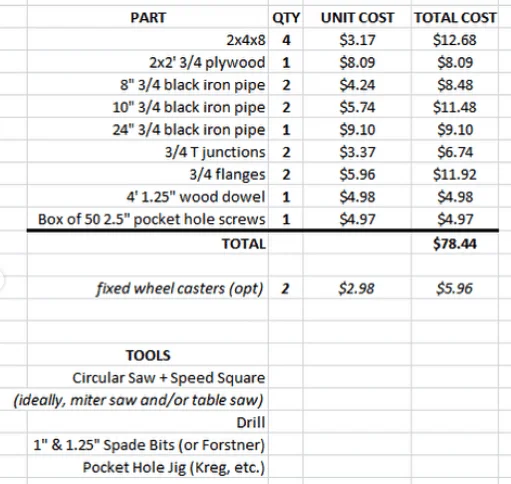
Tools
- Circular Saw– Alternative: Miter Saw and/or Table Saw
- Speed Square
- Power Drill
- 1″ Spade Bit– Alternative: Forstner Bit
- 1.25″ Spade Bit– Alternative: Forstner Bit
- Pocket Hole Jig (We prefer the Kreg Pocket Hole Jig)
Instructions

1. Pipe Arm (Gray on Diagram)
Screw a T-Junction into each end of the 24″ pipe. Screw (2) 10″ pipes into the top T. Screw (2) 8″ pipes into the bottom T.
Make sure all connections are as tight as possible. During usage, you will loosely screw the flanges onto the 8″ pipes after loading plates to prevent them from sliding off.
2. Side Frames (Blue on Diagram)
Set your miter saw at a 15° angle. Cut two of the 2×4’s into (4) 43.25″ pieces.
Make sure the 15° angle slants the same way at both ends, like a parallelogram. These will be the corner posts. Cut the last 2×4 into (2) 12 1/2″ pieces and (2) 33 3/8″ pieces (measured at the bottom/widest point.) Make sure the 15° angle slants the opposite way at both ends, like a trapezoid. These will be the tops and bottoms of the side frames.
Drill two pocket holes in both ends of each top and bottom piece, then screw them into the corner posts side frames. Once the frames are assembled, on the inside top of each frame, make a mark 7″ from the front. Using the 1″ Spade Bit, drill a hole 3/8-1/2″ deep on each piece.
DO NOT DRILL TOO DEEP or the black iron pipe could slide out of the machine during use.
3. Cross Braces (Orange on Diagram)
Reset your miter saw to 0°. Straight cut one 2×4 into (4) 21″ pieces. Drill two pocket holes in both ends of each piece. Stack two of the pieces. Make a mark 4.5″ from each end. Using the 1.25″ Spade Bit, drill all the way through the top piece, and halfway through the bottom piece. These will be the holes the handles (wooden dowels) will be placed in, labeled #3 and #4 on the diagram.
4. Dowel Handles (Green on Plan)
Cut the 48″ dowel in half, making (2) 24″ pieces.

5. Assembly
Stand the side frames up and attach cross brace #1 at the front/bottom of the frames using pocket screws. Place the 10″ segments of the pipe armature in the holes at the top of the frames. Make sure the pipes are fully inserted, you may need to tap the frames with a hammer. Confirm the distance between the frames is now 21″. If it is more than this, remove the pipe, deepen the holes slightly, and recheck.
Install cross braces 2-4. Remember #3 is the one with holes drilled all the way through, and #4 is the one with holes drilled halfway through. Cut one end of the plywood down to 18″ (for an exact fit on the top) or 19-20″ (if you want to wrap upholstery/padding around the edge, so you have somewhere to staple.)
Screw the plywood down on top of the frames (if you have 1.25″ screws, use them, 2.5″ is probably excessive here.) Slide the dowels into the holes in pieces 3 and 4. If the handles are too loose, hammer in a wooden shim to wedge them, then break off the remaining shim. Make a foot strap to loop around the bottom T of the arm. You could use an old belt, dog leash, or buy one by Spud Inc.
6. Optional Upgrades
Attach casters to the back legs; this way you can wheel it around. Adds $5-6. If you want, pad or upholster the top. You could use rubber fitness mats, peel and stick carpet tiles, upholstery foam, and cloth/leather/vinyl, etc. Additional cross braces.
Mine feels sturdy, but if yours doesn’t, add some more cross braces along the bottom or back, just make sure you don’t put them in the path of the swinging arm (with weights loaded.) Paint or stain.
Alternatives
If you’d like a Reverse Hyper but aren’t too sure about building your own, there are many commercial alternatives that are tested and Garage Gym Reviews approved.
Rogue Fitness
Rogue RH-2 Reverse Hyper
Product Highlights
Pros & Cons
Pros
- The Rogue RH-2 Reverse Hyper, simply put, is one of the best value reverse hypers on the market
- The RH-2, like all Rogue equipment, is a solid and well-made piece of equipment. Like one reviewer states, “As with most (all?) Rogue equipment, the RH-2 is a well-made beast.”
- The powder coat finish is traditional matte black that blends well with the rest of Rogue’s equipment.
- Compatible with all increments of bumper and steel plates.
- It’s the perfect rehab machine for lifters who have injured their back, hamstrings, or other muscles in their core as it both stretches and strengthens those muscles.
- Rogue is one of the very few companies to have direct permission from Louie Simmons, creator of the reverse hyper, to manufacture this machine and the RH-2 is the best of the Rogue offerings.
- A 3-inch thick pad wide enough for even the largest of lifters make the RH-2 both comfortable and user-friendly.
- The RH-2 is shipped quickly, arrives quickly, and comes fully assembled to your home or commercial gym.
- Doubles as an excellent stand-up desk when not being used. We’re kind of joking, but not really.
Cons
- It’s expensive for a machine that is used primarily for rehab and stretching.
- At over 200 pounds, it’s difficult to move.
- One reviewer commented that the powder coating was rough making it difficult to clean and keep looking nice.
Bottom Line
The Rogue RH-2 is one of the best value reverse hypers on the market and one of the only ones endorsed by the creator of the reverse hyper, Louie Simmons. The quality of construction, ease of use, maneuverability, and price all make the RH-2 worth it if you plan to use it. However, if you’re in a garage gym setting, understand that a reverse hyper takes up a lot of space and should only be bought if its use is justified.
The Rogue Fitness RH-2 Reverse Hyper is the Reverse Hyper that we most often recommend. It combines outstanding build quality with a price that isn’t beat by any other retailers. Rogue Fitness is known for producing some of the best equipment in the industry, and the RH-2 Reverse Hyper is no different. Featuring 2×3 steel construction with an overbuilt frame and vinyl top, the RH-2 is designed to meet the demands of strength training and rehab facilities alike. If you want a Reverse Hyper and don’t want to build one, this is what we would suggest.
If you’re looking for the absolute cheapest way to own a Reverse Hyper outside of a DIY option, then we suggest the Titan Econonym H-PND Reverse Hyper. The Titan Economy H-PND is not capable of having the weight that many desire on a Reverse Hyper, but what it lacks in strength, it makes up for in value. It’s one of the best-priced reverse hypers available and does a pretty good job all things considered. The Economy H-PND is a great start for those who have yet to find the effectiveness of the Reverse Hyper and is a model we recommend for the budget-conscious.
DIY Reverse Hyper Machine FAQs
What does the reverse hyper work?
The glutes, hamstrings, and lower back are all worked at the same time in the reverse hyper.
Is a DIY reverse hyper worth it?
When trying to reduce extra stress placed on a lifter’s lower back, or hips, a reverse hyperextension machine can be a fantastic workout choice, as it decreases spinal pressure and perhaps assists to stretch the vertebrae in the spine.
How much weight should I put on the reverse hyper machine?
Lifters will frequently load the reverse hyper with several 45-pound plates and easily complete repetitions but then load a few 25-pound plates and struggle to keep an isometric hold for more than 20 seconds.