We test and review fitness products based on an independent, multi-point methodology. If you use our links to purchase something, we may earn a commission. Read our disclosures.
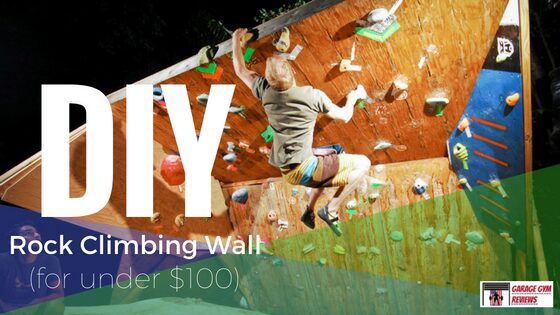
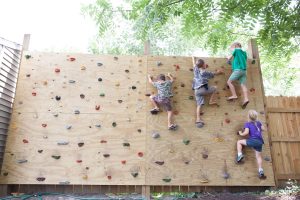
Rock Climbing is a fun activity that’s also extremely taxing physically, making it perfect for a Garage Gym. In this tutorial, we show you how to make your own DIY Rock Climbing Wall for less than $100.
Wow, do I love do-it-yourself projects.
There are so many different things you can make, and often they can be made better and cheaper than what you would buy off the shelf.
One thing you can’t really buy off the shelf is a rock climbing wall. Granted you could call up Walltopiaand have them deliver massive walls, but that would also cost tens of thousands of dollars.
You could also buy something like a campus board from a company like Metolius that I actually use on the regular.
But when it comes to creating a wall for bouldering and the like in the comfort of your home, building it is without a doubt the best option. So, as I was scanning Reddit the other day, I came across a sweet tutorial that I thought I could improve upon.
So, I present to you…

Supplies
- 8′ x 1′ – 3/4″ Birch Plywood. If you’d like to cover more area, simply purchase more wood.
- (107) T-Nuts. For more holds or a larger area, simply purchase more T-Nuts.
- Spare 3/4″ plywood to be used as spacers
- Wood Screws for attaching board to wall
- Wood Glue – Titebond III is the best in our experience
- Climbing Holds
- Power Drill
- Clamps -Optional, but very helpful
Instructions
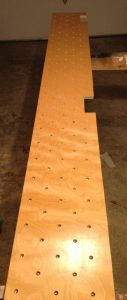
1. Using the power drill, drill holes in a diagonal pattern. For this project, holes were drilled with 2″ between rows and 4″ between columns and then offset to create the diagonal pattern.
For a larger sheet of plywood, just duplicate over the larger area. This amount of holes may seem excessive, but it does allow you to use just about any combination of climbing holds you could ever want.
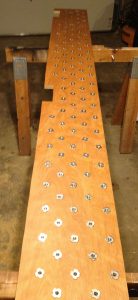
2. Screw in T-Nuts. The T-Nuts allow the climbing holds to screw into the wall.
You want to make sure you put T-Nuts in every hole you plan on using so the layout of the holds can be changed whenever you’d like.
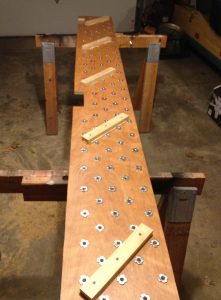
3. Glue plywood spacers to theback ofthe climbing board. using the wood screws, screw from the back of the spacer to create holes for you to use when screwing the board into the wall studs.
You may want to add more spacers based upon how far apart the studs on your home are separated. The spacers allow the bolts of the holds to stick out without digging into the wall.
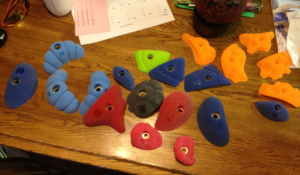
4. Pick out your holds. Amazon actually has a lot of holds to choose from including packaged deals to individual holds.
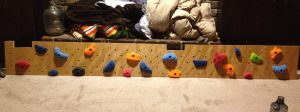
5. Attach holds to board in whatever combination you desire.

6. Climb until your forearms come off.
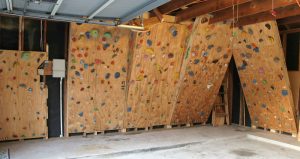
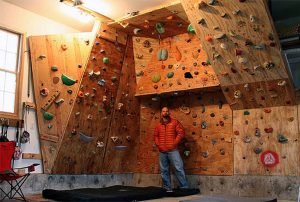
Variations of this Climbing Board Tutorial.
This climbing board tutorial is endless in its possible size.
You can do a thin, yet long board like the one shown all the way to boards that cover your ENTIRE wall!
Here are some variations I’ve seen using the same methods shown in this tutorial:
Enjoyed making a climbing wall, but can’t get enough? Check out our DIY Climbing Pegboard Guide here.

Further reading

If you’re considering adding a high-quality greens powder to your regimen, Primal Greens vs Athletic Greens may be up for debate; read our dietitian’s take on the two here. Read more

In a comparison between treadmill vs treadclimber, a clear winner emerges between two machines that look deceivingly similar. Read more

Looking for the best protein bars? Look no further than our guide to the top 10 options available right now. Read more

Weighted Vests are one of the best value pieces of equipment you can add to your home gym. They’re relatively affordable compared to barbells, racks, and plates yet can be used for a wide variety of movements. After researching more than 50 weight vests and evaluating 19, we believe the Rogue Plate Carrier is the best weight vest for most people. It’s a minimalist vest that does everything you want right and leaves out the rest. If you want to go heavier than 40 LB, our runner-up the Kensui EZ Vest may suit you better. Read more